

Frigate vs Blue Iris is where most people start, but the real choice is wider than two apps. You either run NVR software on a computer you maintain, or you buy a box that does the recording for you. Frigate and Blue Iris are the two software options, one free on Linux and one paid on Windows. UniFi Protect and a Reolink NVR are the two appliances, and once you buy into either, your cameras, drives and phone app tend to follow that brand for years. That lock-in is why it is worth deciding before you buy a single camera.
We ran Frigate 0.18.2 and Blue Iris 6.1.4.13 on two identical 4 vCPU virtual machines and fed both the same four 1080p RTSP camera streams. Then we measured CPU, memory and how many gigabytes each camera writes per day. UniFi Protect and Reolink only run on their own hardware, which our lab does not have, so you’ll find those two sections built on Ubiquiti’s and Reolink’s documentation rather than a test bench. Prices and stock below were checked in October 2026.
Quick verdict: which camera system to buy into
Start from what you already run, because each system rewards a different setup and punishes the wrong one:
- You run Home Assistant or a Linux box already: Frigate. It’s free, it gives you the most control over object detection of the four, and it slots into Home Assistant through its own integration (which needs an MQTT broker, unlike the recorder-only config we show below).
- You want a Windows PC that just records, with a polished desktop console: Blue Iris. Recording four cameras with motion detection took it about a quarter of one core in our test, it works with almost any camera, and the license is $99.95 with a yearly update plan after the first year.
- You already have (or want) UniFi networking: UniFi Protect. No subscription, the best phone app of the four, and the console doubles as your router, but UniFi cameras are the only ones that get the full feature set.
- You want the cheapest working system and no computer at all: a Reolink NVR. A box with a drive inside, eight PoE ports on the back and Reolink cameras that plug straight in.
If you only pick one rule, make it this one. Software NVRs (Frigate, Blue Iris) let you mix camera brands and move to new hardware later. Appliance NVRs (UniFi, Reolink) trade that freedom for a system that keeps working without you. The camera guide we keep for this decision, PoE cameras that work well with Frigate, also covers which models behave under Blue Iris and over ONVIF.
How we tested Frigate and Blue Iris
Both NVRs got the same virtual hardware on the same Proxmox node, so the numbers compare the software and not the box. The four “cameras” were RTSP streams published by mediamtx from a recorded street clip, which gives every run identical motion, people and cars to detect:
- Hardware: 4 vCPU (Intel Core i7-6700, passed through as host CPU), 8 GB RAM, no GPU and no Intel iGPU passthrough, on both VMs.
- Operating systems: Ubuntu 26.04 LTS with Docker for Frigate, Windows Server 2022 for Blue Iris.
- Streams per camera: a 1920×1080 H.264 main stream at 15 fps and 4 Mbit/s, plus a 640×360 sub stream at 10 fps and 512 kbit/s, with no audio.
- Recording: continuous on all four cameras in both NVRs, so disk numbers reflect 24/7 recording.
- Measurement: 40 samples of
docker statsabout 2 seconds apart for Frigate, and 60 samples of the Windows\Process(BlueIris)\% Processor Timecounter for Blue Iris. Both are reported as percent of one core, so 400% is the whole VM.
The clip is a worst case on purpose. All four cameras play the same footage, so every person and car shows up on four cameras at once, which a real yard rarely does. Treat the Frigate numbers as a ceiling for four busy cameras, not an average. Frigate’s install docs also call running it in a VM “not recommended”, though on Proxmox they prefer a QEMU VM over an LXC container. On bare metal with a detector, you should see far lower CPU than we did.
Frigate vs Blue Iris vs UniFi Protect vs Reolink NVR at a glance
The table puts the decision-driving differences side by side. The CPU row is our lab measurement; everything else comes from each vendor’s documentation, linked in the sections below:
| Frigate | Blue Iris | UniFi Protect | Reolink NVR | |
|---|---|---|---|---|
| Runs on | Linux + Docker | Windows 10/11 or Server | UniFi OS consoles only | Reolink NVR hardware |
| Software cost | Free (MIT); Frigate+ models $50/yr optional | $99.95 Full license, updates $44.95/yr after year one | No license fees | Included with the NVR |
| Hardware you buy | Any x86 PC, ideally with an AI accelerator | Windows PC, Intel with Quick Sync preferred | A UniFi OS console, such as the UCG-Max from $199 (no SSD), $279 with 512 GB | The NVR, around $310 for 8 PoE ports and 2 TB |
| Object detection | Built in, runs on CPU, iGPU, Hailo, Coral and more | Built in since v6, needs its AI models installed | Built in on UniFi cameras | Built in for Reolink cameras |
| Third-party cameras | Any RTSP camera | Any RTSP or ONVIF camera | ONVIF: live view, playback, motion, PTZ, audio; no smart detections | ONVIF, “compatibility cannot be guaranteed” |
| Home Assistant | Official integration (HACS) | Community integrations only | Core integration | Core integration |
| 4 cameras, CPU (our lab) | 298% avg with object detection on CPU | 24% avg, motion detection only | Not tested | Not tested |
Read the CPU row carefully, because it is the number people misquote. Blue Iris was doing motion detection and recording, while Frigate was running a neural network on every moving object on four cameras with no accelerator. The fair takeaway is that Blue Iris records very cheaply, and that Frigate on a bare CPU needs a detector (a Hailo-8, a Coral or an Intel iGPU) before it can scale past a couple of busy cameras. We break both results down below.
1. Frigate
Frigate wins on detection quality and on price, and it’s the only one of the four that turns a camera into a Home Assistant sensor without a workaround. It’s free under the MIT license, it reads any RTSP camera, and it records the camera’s own stream to disk without re-encoding it, so storage costs exactly what the camera sends. What you pay instead is time: it’s a Docker container configured in YAML, and it wants detection hardware to do its best work.
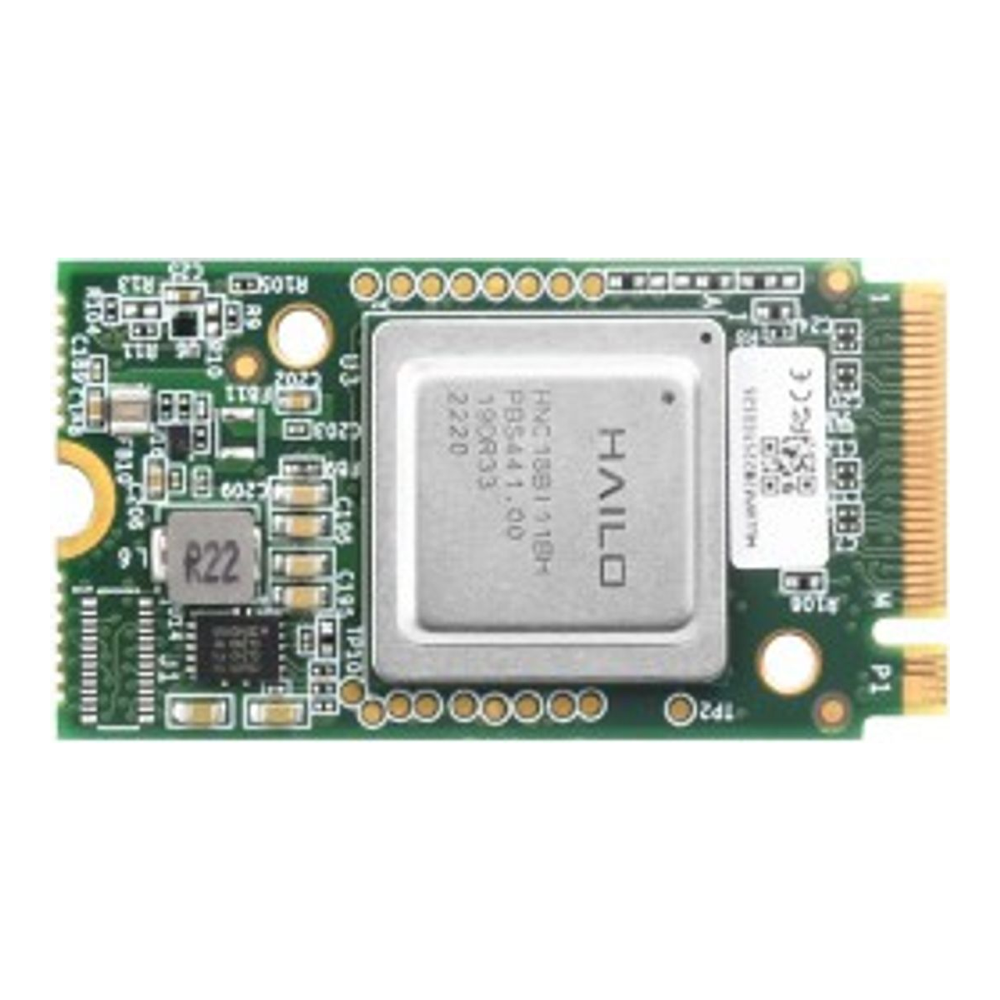
The host needs Docker with the Compose plugin first. On Ubuntu these are the packages we installed, plus jq for reading Frigate’s stats later; our Frigate install guide covers the other distros:
sudo apt install -y docker.io docker-compose-v2 jqCreate the project folders before you write any files into them:
mkdir -p ~/frigate/config ~/frigate/storageThe Compose file we ran is short. Frigate serves its authenticated web UI on port 8971, and the tmpfs mount keeps recording segments in RAM until they are moved to disk:
sudo vim ~/frigate/compose.yamlAdd the service definition:
services:
  frigate:
    image: ghcr.io/blakeblackshear/frigate:stable
    container_name: frigate
    restart: unless-stopped
    shm_size: "512mb"
    volumes:
      - /etc/localtime:/etc/localtime:ro
      - ./config:/config
      - ./storage:/media/frigate
      - type: tmpfs
        target: /tmp/cache
        tmpfs:
          size: 1000000000
    ports:
      - "8971:8971"
      - "8554:8554"
      - "8555:8555/tcp"
      - "8555:8555/udp"
The camera config is where Frigate differs from the other three. Each camera gets a record input (the full-resolution main stream) and a detect input (the cheap sub stream), and the detector is OpenVINO on the CPU, using the SSDLite MobileNet model that ships inside the image. Replace 10.0.1.50:8654/cam1 with your camera’s RTSP URL:
sudo vim ~/frigate/config/config.ymlThis is the one-camera file exactly as it ran in the lab:
mqtt:
  enabled: false

detectors:
  ov:
    type: openvino
    device: CPU

model:
  width: 300
  height: 300
  input_tensor: nhwc
  input_pixel_format: bgr
  path: /openvino-model/ssdlite_mobilenet_v2.xml
  labelmap_path: /openvino-model/coco_91cl_bkgr.txt

record:
  enabled: true
  continuous:
    days: 7
  alerts:
    retain:
      days: 30
  detections:
    retain:
      days: 30

cameras:
  driveway:
    ffmpeg:
      inputs:
        - path: rtsp://10.0.1.50:8654/cam1
          roles:
            - record
        - path: rtsp://10.0.1.50:8654/cam1_sub
          roles:
            - detect
    detect:
      enabled: true
      width: 640
      height: 360
      fps: 5
Start it from the ~/frigate directory. The first start pulls an 8.7 GB image, which took a little over three minutes on our connection, and the API answered 15.5 seconds after up -d. The admin password is printed once in docker logs frigate, so copy it before the log rotates:
cd ~/frigate && sudo docker compose up -dThen open https://10.0.1.50:8971 (your host’s address), accept the self-signed certificate and log in as admin with that password.
Detection is off unless you turn it on
Our first config had no enabled: true under detect, and Frigate happily recorded for three minutes without finding a single person. The stats API showed "detection_enabled":false and a detection rate of zero. In the 0.18 source, detect.enabled defaults to False, so a camera added without that line is a recorder, not a detector. Add the line, restart the container, and confirm the detector is busy with the stats endpoint:
sudo docker exec frigate curl -s http://127.0.0.1:5000/api/stats | jq '{detectors: (.detectors | map_values({inference_speed})), cameras: (.cameras | map_values({camera_fps, process_fps, skipped_fps, detection_fps, detection_enabled}))}'With all four cameras running, each one should report detection_enabled as true and a detection_fps above zero:
{
  "detectors": {
    "ov": {
      "inference_speed": 18.45
    }
  },
  "cameras": {
    "driveway": {
      "camera_fps": 5.0,
      "process_fps": 4.2,
      "skipped_fps": 0.8,
      "detection_fps": 5.5,
      "detection_enabled": true
    },
    "porch": {
      "camera_fps": 5.1,
      "process_fps": 4.7,
      "skipped_fps": 0.7,
      "detection_fps": 5.3,
      "detection_enabled": true
    },
    "garage": {
      "camera_fps": 5.1,
      "process_fps": 4.3,
      "skipped_fps": 0.8,
      "detection_fps": 5.3,
      "detection_enabled": true
    },
    "backyard": {
      "camera_fps": 5.0,
      "process_fps": 4.3,
      "skipped_fps": 0.7,
      "detection_fps": 5.6,
      "detection_enabled": true
    }
  }
}
Every camera delivers its 5 frames per second, but process_fps sits between 4.2 and 4.7 and skipped_fps at 0.7 to 0.8, so Frigate is already throwing away about one frame in seven before it reaches the detector. The 18.45 ms inference_speed is nearly double the 10.27 ms we measured with one camera. A healthy system keeps skipped_fps at or near zero. Ours had no headroom left: in an earlier capture taken while another busy VM shared the same Proxmox host, skipped frames jumped to 3.3 to 3.5 out of every 5. The inference times in this section come from separate runs (12.77 ms in the first four-camera run, about 20 ms on the System page, 18.45 ms in the output above), and they all say the same thing: inference time grows as the cameras compete for the same cores.
What four cameras cost Frigate on a bare CPU
Over 40 samples about two seconds apart, Frigate with one camera averaged 151.5% of one core and about 800 MiB of RAM. With four cameras it averaged 297.9% with a median of 386.2%, so most of the time it held all four vCPUs, and the load average reached 9.66. Turning detection off on all four cameras dropped the median to 32.5%, close to Blue Iris’s 25%, which tells you the expensive part is the neural network, not the recording. A single snapshot from a later four-camera capture looks like this:
sudo docker stats --no-stream frigate381.59% means 3.8 of the 4 vCPUs were busy inside the container at that moment, and memory stayed modest at 1.36 GiB:
CONTAINER ID   NAME      CPU %     MEM USAGE / LIMIT    MEM %     NET I/O        BLOCK I/O       PIDS
8fc76268cff9   frigate   381.59%   1.363GiB / 7.75GiB   17.59%    696MB / 14MB   251MB / 512MB   511
Frigate’s System page draws the same picture, and it’s the screen to watch after you add each camera:

- 1Detector inference speed
- 2Detector CPU usage
- 3Host CPU load
The three marked readings are the ones that tell you when Frigate is out of CPU:
- Detector inference speed climbed from about 10 ms with one camera to around 20 ms with four, because the CPU detector was now sharing cores with four video decoders.
- Detector CPU usage read between 260% and 280% on our two captures, which is nearly three of the four cores doing nothing but neural network inference.
- Host CPU load in the footer read 89% to 93%, and Frigate was already dropping frames at four cameras.
An accelerator fixes exactly this. Frigate’s hardware docs put a Hailo-8 at about 7 ms per inference, running on its own silicon instead of your cores. An Intel N100 or N150 iGPU comes in at about 15 ms with OpenVINO set to GPU. Either one moves inference off the CPU, and inference was what filled our four cores. We compare those detectors with measured numbers in Hailo vs Coral for Frigate, and the full parts list for a dedicated machine is in our Frigate NVR appliance build.
Who should pick Frigate: Home Assistant users, anyone who wants person and car detection without paying a license, and people who mix camera brands. Skip it if you don’t want to edit YAML or run Docker, or if your only spare machine is an old CPU with no AVX2 and no slot for an accelerator. The step-by-step setup with MQTT, zones and TLS is in our Frigate on Docker install guide. The Hailo-8 M.2 module pictured above runs about $220 on Amazon (check the live price).
2. Blue Iris
Blue Iris wins on efficiency and camera compatibility. In our lab it recorded four 1080p cameras around the clock on roughly a quarter of one core. It manages that by writing the camera’s stream straight to disk and decoding only the small sub stream for motion detection and the live grid. It talks to nearly every RTSP and ONVIF camera made, and the desktop console exposes a setting for almost everything. The platform is the price: it runs only on Windows, and you pay every year you want updates.

Adding a camera is a dialog, not a config file. The screen that decides how hard your PC works is the first one, and its most important checkbox is unticked by default:

- 1Network IP
- 2Copy from another camera
- 3Direct-to-disk recording
We set up all four cameras from this dialog:
- Leave the type on Network IP, then enter the RTSP address, port and stream paths on the next screen. Put the camera’s sub stream in the Sub field so Blue Iris has a cheap stream to decode.
- For every camera after the first, choose Copy from another camera, which clones the recording and motion settings, then change only the stream paths.
- Tick Direct-to-disk recording. Without it, Blue Iris re-encodes what it records, which is where most of the “Blue Iris needs a big PC” reputation comes from.
With those settings and recording set to Continuous, Blue Iris averaged 24.1% of one core across 60 samples (median 25.0%, peak 35.9%). It held 272 MiB of private memory for all four cameras. The whole VM averaged 9.3% CPU. Its Status window confirmed why it is so cheap: it was taking in 2,227 kB/s from the cameras but decoding only 9.2 megapixels per second, which matches four 640×360 sub streams at 10 fps and not the 1080p main streams.
That number has a limit you should know about. Blue Iris 6 made AI detection part of the program, but on a fresh install it isn’t running yet. Every new camera’s AI tab opens like this:

The tab reads AI is offline. Object detection, extra models and facial recognition are ticked but have nothing to run them, and the greyed server field points at 127.0.0.1:32168. Our 24% is motion detection only. Once you install the AI models and turn on object confirmation, Blue Iris starts doing the same kind of inference Frigate does, and the CPU cost moves toward Frigate’s unless you add an NVIDIA GPU. Two more things the trial showed us: every recording and the live view carry a “Blue Iris Evaluation Version” overlay until you license it, and the default storage allocation on a 64 GB system drive was flagged as overallocated by 16.3 GB, so point the New folder at a dedicated surveillance drive before you record anything.
The cost also needs a second look. On the Blue Iris site, a Full license is $99.95 and includes a year of updates; after that the basic update plan is $44.95 a year. Add a Windows license if your PC does not have one. Over five years with updates, that is $99.95 plus four renewals at $44.95, or $279.75 in software alone. Updates are optional, but Blue Iris is the only one of the four where staying current costs money every year. Home Assistant support exists only through community integrations. The original elad-bar integration is no longer maintained by its author, and kramttocs/ha-blueiris now carries on as a separate community codebase.
Blue Iris fits people who want a Windows desktop NVR with a deep settings menu, many cameras of mixed brands, and low CPU per camera. Look elsewhere when you do not want a Windows machine running 24/7, or if Home Assistant automations are the point of your cameras. Our Blue Iris PC guide sizes the hardware by camera count, and the HP Elite Mini 800 G9 above is around $330 renewed on Amazon (check the live price).
3. UniFi Protect
UniFi Protect wins on polish and on running cost. There are no license or subscription fees, and the same console that runs Protect also runs your router, Wi-Fi and switches if you go all in on UniFi. Of the four, it is the one built for people who will never open a terminal: setup and viewing happen in Ubiquiti’s apps. You can’t self-host it, though. Protect only runs on UniFi OS consoles, and Home Assistant’s own docs note that Ubiquiti does not offer it for self-hosting.

The console you pick sets how many cameras and how much storage you get. The Ubiquiti US store listed these in October 2026, next to a US price with the surcharge included (the 512 GB UCG-Max comes to $307 that way):
- UCG-Max, $199 without storage or $279 with a 512 GB SSD: a router and NVR in one, with 1 TB and 2 TB versions above that. Right for a handful of cameras at home.
- UNVR, $299: a dedicated rack NVR with four drive bays. Right when you already have a UniFi router and want hard drives, not NVMe.
- UNVR Pro, $499: seven bays in 2U for larger camera counts and longer retention.
Third-party cameras are where Protect falls behind the software NVRs. Current Protect releases let you adopt ONVIF cameras by turning on Discover Third-Party Cameras under Settings, System, and Ubiquiti’s third-party camera help page lists live view, playback, motion, PTZ and audio as supported, with other advanced features not supported. In practice the smart detections, the AI Key’s search features and the nicest parts of the app are for UniFi cameras. Buy into Protect expecting to buy UniFi cameras. Home Assistant has a core UniFi Protect integration, which needs Protect 7.2.105 or later and an API key created in Protect.
Protect suits households and small offices already on UniFi networking, or anyone who values the app and zero maintenance over camera choice. It is the wrong buy when you own non-UniFi cameras you want full features on, or if you want to run your NVR on your own server. We compare the gateways in more depth in our UniFi Cloud Gateway comparison. The UCG-Max with a 512 GB SSD is about $330 on Amazon (check the live price). Compare it with the 512 GB option and the surcharge on Ubiquiti’s own store before you buy.
4. Reolink NVR
A Reolink NVR wins on price and on simplicity. The RLN8-410 is a small box with eight PoE ports on the back, a 2 TB drive inside, and Reolink’s person, vehicle and pet detection already working for Reolink cameras you plug into it. There is no computer to maintain, no license to renew and no subscription for local recording. For a family that wants cameras on the house this weekend, it’s the shortest path of the four.

Reolink’s RLN8-410 spec page lists the NVR with 8 PoE ports (802.3af/at, up to 25 W per port, 10/100 Mbit/s) and support for cameras up to 16MP in H.264 or H.265. Storage is one internal SATA bay plus eSATA, and RTSP and ONVIF are in its protocol list. The bigger RLN16-410 doubles the PoE ports and Reolink’s German product page lists it with a 4 TB drive, while the RLN36 drops PoE for three drive bays and up to 36 channels.
The limits show up when you leave Reolink’s ecosystem. Reolink says the NVR accepts third-party cameras over ONVIF but that “compatibility cannot be guaranteed”. Its ONVIF support article adds conditions: the camera must sit on your LAN rather than on the NVR’s PoE ports, it must use WSSE authentication, and MJPEG streams aren’t supported. Reolink’s smart detection is built around its own cameras. For tinkerers, the saving grace is that the NVR exposes RTSP, and Home Assistant’s core Reolink integration supports NVRs directly, so a Reolink system can later feed Frigate if you outgrow the built-in detection.
A Reolink NVR is for anyone who wants the cheapest reliable recorder for Reolink cameras and no computer in the loop. Pass on it if you plan to mix camera brands, or if 10/100 PoE ports and a single internal drive bay are too small for where you are going. The RLN8-410 with a 2 TB drive is around $310 on Amazon (check the live price).
How much storage each camera system needs
Plan storage from your cameras’ bitrate, because an NVR that records without re-encoding can only store what the camera sends. Frigate copies the stream to disk, and our run measured it exactly: four cameras added 1.33 GB in 701 seconds, which is 3.79 Mbit/s per camera from a 4 Mbit/s stream, or 1.71 GB an hour and about 41 GB a day for each camera recording 24/7. Frigate’s Storage page agreed at 1.61 to 1.62 GiB per hour per camera.
Blue Iris surprised us here. From the identical streams, with direct-to-disk ticked and recording set to Continuous, it wrote 1.10 MB/s for the four cameras over five minutes, about 2.2 Mbit/s each, and both the process’s own write counter and the growth of its recording folder agreed. That is 42% less than Frigate stored. The camera’s Video tab had defaulted to a 10 fps maximum rate against our 15 fps streams, which may explain it, but we didn’t confirm the cause, so don’t count on the saving. Size drives for the full camera bitrate and check real usage after the first day.

Multiply that out and the drive size follows. These figures use the 41 GB a day we measured per camera, recording 1080p continuously from a 4 Mbit/s stream. A 4K camera at 8 Mbit/s roughly doubles them, and event-only recording cuts them by however much of the day is quiet:
| Cameras (3.79 Mbit/s measured, 24/7) | Per day | 14 days | 30 days |
|---|---|---|---|
| 4 | 164 GB | 2.3 TB | 4.9 TB |
| 8 | 328 GB | 4.6 TB | 9.8 TB |
| 16 | 655 GB | 9.2 TB | 19.6 TB |
So the 2 TB drive inside a Reolink RLN8-410 holds about 12 days of four cameras recording continuously, and an 8 TB surveillance drive holds about 48 days. Use a drive rated for 24/7 writes, such as a WD Purple or Seagate SkyHawk, rather than a desktop drive; our surveillance hard drive guide compares them, and the 8 TB WD Purple is about $445 on Amazon (check the live price).
Pick by what you already own
Most people don’t start from zero, and the hardware already in the house usually decides this faster than any feature list:
- A Home Assistant server or a spare Linux mini PC: Frigate. Add a Hailo-8 or use the Intel iGPU, and follow the Home Assistant on Ubuntu guide if you don’t have that side running yet.
- A Windows PC that is on all the time anyway: Blue Iris, with direct-to-disk ticked on every camera and recordings on their own drive.
- A UniFi router or access points: UniFi Protect on the console you have, or a UCG-Max if you’re replacing an older gateway.
- Nothing, and no interest in maintaining a computer: a Reolink NVR with Reolink cameras, which you can still pull into Home Assistant or Frigate later over RTSP.
Whichever you choose, buy the cameras last. A camera that is perfect for Protect may be a second-class citizen on a Reolink NVR, and the right camera for Frigate is the one with a clean RTSP sub stream, which our PoE camera guide checks model by model. Power them from a switch with enough PoE budget for every camera at once, which our PoE switch roundup sizes for you.


