Building an application is only one part of the software development process. Once an application is ready, it needs to be packaged, tested, distributed, and deployed consistently across different environments. Performing these tasks manually can quickly become repetitive and error-prone, especially when an application is updated frequently.
Docker and GitHub Actions provide a practical solution to this problem. For example, Docker packages a Node.js application and its dependencies into a portable container image, while GitHub Actions automates the process of testing, building, and publishing that image. The deployment environment can then retrieve the newly published image and start the updated application automatically.
In this article, we will build a workflow for a Node.js application. We will start by creating the application, containerize it with Docker, publish the image to Docker Hub, and then configure a GitHub Actions workflow that automatically builds and publishes a new image whenever changes are pushed to the GitHub repository.
1. The Problem with Traditional Deployments
A traditional deployment often requires a developer to manually connect to a server, retrieve the latest source code, install dependencies, restart the application, and verify that everything is working correctly.
This process may appear manageable for a small project. However, as an application evolves and deployments become more frequent, manual operations introduce unnecessary risk. We might forget to install a dependency, use the wrong Node.js version, leave an old process running, or deploy code that has not been tested properly.
There is also the problem of environment differences. The development machine might use one Node.js version while the production server uses another. Operating system libraries, environment variables, filesystem configuration, and dependency versions can also differ.
Docker addresses the environment problem by packaging the application with the runtime environment it requires. Instead of asking the production server to recreate the application’s environment manually, the server runs a Docker image containing the application and its required dependencies.
CI/CD addresses another part of the problem: automation. Instead of manually testing and packaging every change, a pipeline can perform these operations whenever code is pushed to a particular branch. The result is a deployment process that is more consistent, repeatable, and easier to maintain.
2. What is Docker and How It Works
Docker provides a way to package applications into lightweight, isolated containers. A Docker container contains the application and the software required to run it, allowing the application to behave consistently across environments.
There are several Docker concepts that are important for this article. A Dockerfile describes how an application image should be built. A Docker image is the packaged result of that build process. A container is a running instance of an image. Finally, a container registry stores images so that they can be downloaded by other systems.
For example, we can build an image locally and run it as a container. The same image can then be pushed to Docker Hub and pulled onto a Virtual Private Server.
This separation is useful because the server does not need to rebuild the application from source code. It simply downloads the already-built image and runs it.
Docker images are also immutable in the sense that a particular image represents a specific application build. When a new version is created, a new image can be published. This makes it easier to identify which version is running and, when appropriate, roll back to an earlier image.
Key Docker Concepts
Image
A blueprint for creating containers. It is built from a Dockerfile.
Container
A running instance of an image.
Dockerfile
A script that defines how an image is built.
Registry
A storage location for Docker images (e.g., Docker Hub, GitHub Container Registry).
3. Prerequisites
This tutorial assumes that the application will be developed locally, stored in a GitHub repository, published to Docker Hub, and eventually deployed to a Linux-based Virtual Private Server.
You should have Node.js and npm installed locally, together with Docker and Git. You will also need a GitHub account and a Docker Hub account.
For the deployment portion, you will need a VPS with Docker installed and SSH access configured. The exact VPS provider is not important because the deployment process relies primarily on SSH and Docker.
It is also useful to have a basic understanding of Node.js, Express, Git, Docker commands, and YAML configuration files. You do not need previous experience with GitHub Actions because the workflow will be explained.
4. Build a Production-Ready Node.js Application
The first step is to create the application that will eventually be placed inside a Docker container. Although the example application is intentionally small, the same principles can be applied to larger REST APIs and backend services.
Create a new Node.js project and initialize npm.
mkdir node-docker-app
cd node-docker-app
npm init -y
npm install express
These commands create the project directory, initialize a Node.js project, and install Express as the application’s web framework. The resulting project will contain a package.json file describing the application and its dependencies.
Create an index.js file containing the application logic.
const express = require("express");
const app = express();
app.use(express.json());

const PORT = process.env.PORT || 3000;

app.get("/", (req, res) => {
    res.json({
        message: "Hello from a Dockerized Node.js application",
        environment: process.env.NODE_ENV || "development"
    });
});

app.get("/health", (req, res) => {
    res.status(200).json({
        status: "OK"
    });
});

app.listen(PORT, () => {
    console.log(`Server running on port ${PORT}`);
});
The application exposes two endpoints. The root endpoint provides a simple response that confirms the application is running, while /health acts as a health endpoint that can be used by deployment and monitoring systems.
Notice that the application obtains its port from the PORT environment variable and falls back to port 3000. This is important for containerized applications because the same image can be deployed in environments where the application port is configured differently.
Update the package.json scripts:
  "scripts": {
    "start": "node src/index.js"
  }
The start script provides a standard command for launching the application. Docker and deployment environments can use this command rather than depending on a machine-specific startup process.
Before introducing Docker, test the application locally:
npm start
Running the application locally first provides a useful baseline. If the application does not work before containerization, Docker is unlikely to solve the underlying application problem.
5. Understanding the Dockerfile
The Dockerfile is the central configuration file used to transform the Node.js project into a Docker image. It describes the base image, working directory, dependencies, source files, exposed port, and command used to start the application.
Create a file named Dockerfile in the root of the project.
FROM node:20-alpine

WORKDIR /app

COPY package*.json ./

RUN npm ci --omit=dev

COPY . .

ENV NODE_ENV=production

EXPOSE 3000

CMD ["node", "src/index.js"]
The FROM instruction selects the Node.js runtime used by the application. The Alpine variant provides a relatively small base image, which can reduce image size and transfer time.
WORKDIR establishes /app as the working directory inside the container. The package files are copied before the rest of the source code so Docker can reuse the dependency installation layer when application source files change but the dependencies remain unchanged.
RUN npm ci --omit=dev installs the exact dependency versions recorded in package-lock.json and excludes development dependencies. Development-only packages are excluded because they are not required to run the application in production.
The ordering of these instructions is important because Docker builds images in layers. Structuring the
Dockerfile properly allows Docker to reuse unchanged layers and significantly reduce build time.Optimizing with .dockerignore
Not every file in the project should be copied into the Docker build context. Local dependencies, Git metadata, logs, and development files are unnecessary for the production image.
Create a .dockerignore file:
node_modules
npm-debug.log
.git
.gitignore
Dockerfile
.dockerignore
.env
README.md
This configuration prevents unnecessary files from being sent to Docker during the build. In particular, excluding node_modules is important because dependencies should be installed inside the image using the package manifest.
The .env file is also excluded because sensitive configuration should not be baked into the Docker image. Production secrets should instead be supplied through the deployment environment. Keeping the Docker build context small can improve build performance and reduce the possibility of accidentally exposing development files or sensitive information.
6. Building and Running the Container
With the Dockerfile and .dockerignore in place, the application can now be converted into a Docker image.
Build the image with:
docker build -t node-docker-app .
The docker build command reads the Dockerfile and creates an image. The -t option assigns the image the name node-docker-app, while the final period tells Docker to use the current directory as the build context.
After building the image, start a container:
docker run -p 3000:3000 --name node-app node-docker-app
The -p option maps port 3000 on the host machine to port 3000 inside the container. The --name option gives the container a convenient name. The application can now be accessed through the host machine at port 3000.
For a background process, the container can be started in detached mode:
docker run -d -p 3000:3000 --name node-app node-docker-app
The -d option runs the container in the background. This is closer to how a container will normally run on a server. You can inspect the running container with:
docker ps
And stop it with:
docker stop node-app
These commands are useful during local development because they allow us to verify that the Docker image behaves correctly before introducing the CI/CD pipeline.
Multi-Stage Builds for Smaller Images
For simple Node.js applications, a single-stage Dockerfile may be sufficient. Larger applications, however, can benefit from multi-stage builds. A multi-stage build allows the Dockerfile to use one stage for building the application and another stage for running it.
FROM node:20-alpine AS builder

WORKDIR /app

COPY package*.json ./

RUN npm ci

COPY src ./src


FROM node:20-alpine AS production

WORKDIR /app

COPY package*.json ./

RUN npm ci --omit=dev

COPY --from=builder /app/src ./src

ENV NODE_ENV=production

EXPOSE 3000

CMD ["node", "src/index.js"]
The first stage installs all dependencies and prepares the application. The second stage starts from a clean Node.js image and copies the application from the builder stage.
The final image does not need to contain the tooling or development dependencies used during the build stage. This can reduce the size of the final image and decrease the amount of unnecessary software present in the production container.
For applications that require compilation, TypeScript, frontend builds, or other build-time tooling, multi-stage Dockerfiles become particularly useful.
7. Tagging and Pushing to a Registry
A locally built Docker image is not automatically available to a production server. The image needs to be published to a container registry that the deployment server can access.
Docker Hub is one option for storing container images. First, authenticate with Docker Hub:
docker login
After authentication, tag the image using your Docker Hub repository name:
docker tag node-docker-app yourusername/node-docker-app:latest
The tag identifies where the image should be published. The latest tag is commonly used for the most recent build, although version-specific tags are preferable for production deployments.
Push the image:
docker push yourusername/node-docker-app:latest
Docker uploads the image layers to Docker Hub. Once the operation completes, another machine with permission to access the repository can pull the image.
Version tags can also be used:
docker tag node-docker-app yourusername/node-docker-app:1.0.0
docker push yourusername/node-docker-app:1.0.0
Versioned images make deployments easier to trace because a deployment can explicitly reference a known version instead of relying entirely on a moving latest tag.
8. Introduction to GitHub Actions CI/CD
At this point, the application can be containerized and published manually. The next step is to remove that manual work by introducing GitHub Actions. GitHub Actions provides automation directly within a GitHub repository. A workflow can respond to repository events, execute commands, run tests, build Docker images, and publish artifacts.
The goal of this article is to create a workflow where we can edit the source code, commit the change, and push it to GitHub. Once the change reaches the configured branch, GitHub Actions takes over the repetitive deployment tasks.
The complete process will be:
Code Change → Git Commit → Git Push → Automated Tests → Docker Image Build → Docker Hub Publication → VPS Deployment
This approach turns the Git repository into the starting point for the deployment process.
Creating the Workflow File
GitHub Actions workflows are YAML files stored inside the .github/workflows directory of the repository. Create a file named deploy.yml.
name: Node.js CI/CD

on:
  push:
    branches:
      - main

jobs:
  build-and-publish:
    runs-on: ubuntu-latest

    steps:
      - name: Checkout source code
        uses: actions/checkout@v4

      - name: Set up Node.js
        uses: actions/setup-node@v4
        with:
          node-version: 20

      - name: Install dependencies
        run: npm ci

      - name: Log in to Docker Hub
        uses: docker/login-action@v3
        with:
          username: ${{ secrets.DOCKER_USERNAME }}
          password: ${{ secrets.DOCKER_PASSWORD }}

      - name: Build Docker image
        run: docker build -t ${{ secrets.DOCKER_USERNAME }}/node-docker-app:latest .

      - name: Push Docker image
        run: docker push ${{ secrets.DOCKER_USERNAME }}/node-docker-app:latest
This workflow is triggered whenever code is pushed to the main branch. GitHub creates an Ubuntu-based runner and executes the defined steps sequentially.
The first step checks out the repository so that the workflow has access to the Node.js source code, package.json, package-lock.json, Dockerfile, and other project files.
The Node.js setup step configures Node.js 20 on the GitHub Actions runner. The npm ci command then installs the dependencies specified by package-lock.json. Using npm ci is appropriate for CI environments because it provides a clean and reproducible dependency installation.
After the dependencies are installed, the workflow authenticates with Docker Hub using credentials stored as GitHub Actions secrets. It then builds the Docker image using the Dockerfile located in the project root.
The image is tagged using the Docker Hub username stored in DOCKER_USERNAME:
yourusername/node-docker-app:latest
Finally, docker push publishes the image to Docker Hub. At this point, the newly built image is available for the deployment environment to retrieve.
At this stage, the project should have a structure similar to the following:
node-docker-app/
├── .github/
│   └── workflows/
│       └── deploy.yml
├── src/
│   └── index.js
├── .dockerignore
├── .env
├── .gitignore
├── Dockerfile
├── package.json
└── package-lock.json
The src directory contains the Node.js application, while the Dockerfile describes how the application is packaged into a container. The .github/workflows/deploy.yml file contains the CI/CD workflow that GitHub Actions will execute.
Managing Secrets Securely
A CI/CD pipeline frequently needs access to credentials, API keys, SSH keys, and other sensitive configuration. These values should never be committed directly to the repository. Docker Hub credentials are used by the GitHub Actions workflow to authenticate with Docker Hub before building and publishing the image.
Go to:
GitHub repository → Settings → Secrets and variables → Actions → Secrets → New repository secret
Add these two secrets:
| Secret | Value |
|---|---|
| DOCKER_USERNAME | Your Docker Hub username |
| DOCKER_PASSWORD | Your Docker Hub access token |
GitHub injects these values into the workflow when it runs without requiring them to appear in the source code. For a VPS deployment, additional secrets will be required, such as the server hostname, username, and SSH private key. This separation is important because the workflow definition can remain in the repository while sensitive credentials remain protected by the GitHub Actions secrets mechanism.
Commit and Push the Workflow
After creating the workflow file, stage it, create a commit with and push the changes to the main branch using:
git add .
git commit -m "Add GitHub Actions CI/CD workflow"
git push origin main
The push to main is what triggers the GitHub Actions workflow.
After pushing the workflow, open the GitHub repository in your browser and select the Actions tab. You should see a workflow named: Node.js CI/CD.
Click the workflow run to see the individual steps being executed. A successful run should show steps similar to:
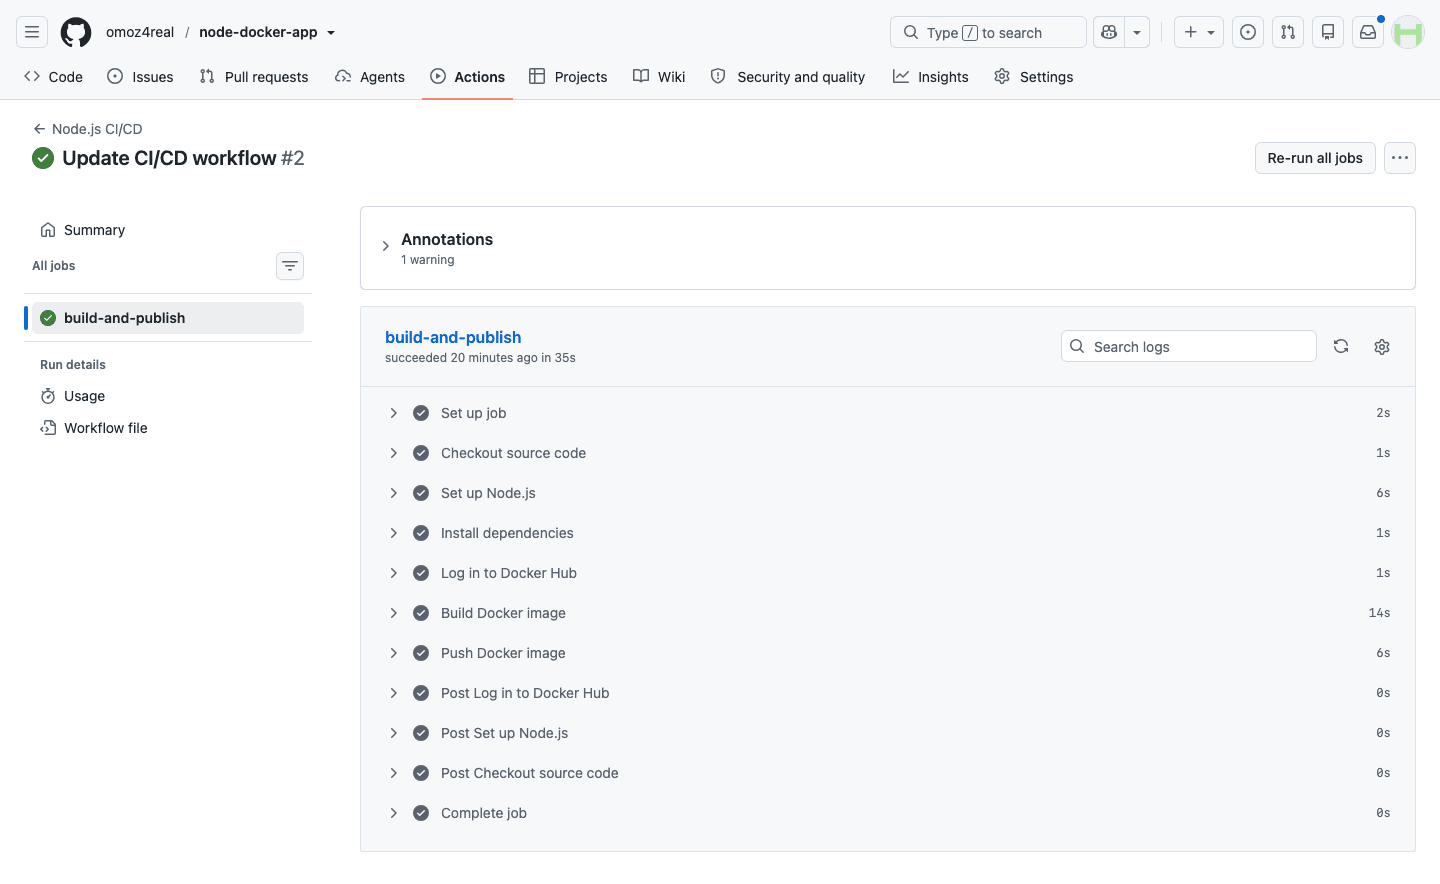
Once the workflow completes successfully, open your Docker Hub repository. You should see: node-docker-app:latest. This confirms that GitHub Actions successfully built the Docker image and published it to Docker Hub.
At this point, the CI portion of the pipeline is working. The next stage is to configure the Virtual Private Server so that it can pull the newly published Docker image and automatically restart the application whenever a new image is available.
9. Deploying the Docker Image to a VPS
Once GitHub Actions has successfully built the Docker image and published it to Docker Hub, the image can be deployed to a Virtual Private Server or another Docker-enabled server. The server does not need the application source code because it can retrieve the already-built image directly from Docker Hub.
First, connect to your VPS through SSH and pull the latest image:
docker pull yourusername/node-docker-app:latest
Replace yourusername with your actual Docker Hub username. The docker pull command downloads the image published by the GitHub Actions workflow to the server.
Once the image has been downloaded, Docker has everything required to start the application without needing to clone the GitHub repository or install Node.js directly on the VPS.
After pulling the image, start the application with:
docker run -d \
  --name node-app \
  -p 3000:3000 \
  -e NODE_ENV=production \
  -e PORT=3000 \
  yourusername/node-docker-app:latest
When a new version of the application is pushed to main, GitHub Actions builds a new Docker image and publishes it to Docker Hub. The VPS can then retrieve the latest image and replace the currently running container.
10. Using Docker Compose for Better Management
As the application grows, managing containers with long docker run commands can become difficult, especially when environment variables, restart policies, volumes, and networking need to be configured. Docker Compose provides a cleaner way to define the application’s container configuration in a YAML file and manage the container with simple commands.
Create a compose.yml file in the project root:
services:
  app:
    image: yourusername/node-docker-app:latest
    container_name: node-app
    ports:
      - "3000:3000"
    environment:
      NODE_ENV: production
      PORT: 3000
    restart: unless-stopped
The image property specifies the Docker image that Docker Compose should run, while container_name gives the container a predictable name.
The ports configuration maps port 3000 on the VPS to port 3000 inside the container. The environment section supplies the production environment variables used by the Node.js application.
The restart: unless-stopped policy tells Docker to automatically restart the container if it stops unexpectedly or if the VPS is restarted. The container will remain stopped only when it has been explicitly stopped by the administrator.
The application can then be started with:
docker compose up -d
Health Checks and Monitoring
A running Docker container does not necessarily mean that the application inside it is functioning correctly. The Node.js process could stop responding while the container itself remains running, which is why a health check is useful. The /health endpoint already implemented in this application provides a simple way to verify that the Express server is responding.
Docker Compose can use this endpoint to determine whether the application is healthy. Add a healthcheck configuration to the Compose file:
services:
  app:
    image: yourusername/node-docker-app:latest
    container_name: node-app
    ports:
      - "3000:3000"
    environment:
      NODE_ENV: production
      PORT: 3000
    restart: unless-stopped
    healthcheck:
      test: ["CMD", "wget", "--spider", "-q", "http://localhost:3000/health"]
      interval: 30s
      timeout: 10s
      retries: 3
      start_period: 10s
The healthcheck instructs Docker to periodically request the application’s /health endpoint. The interval determines how frequently the check runs, while timeout specifies how long Docker waits for a response.
The retries property specifies how many consecutive failures are required before Docker considers the container unhealthy. The start_period gives the Node.js application a short amount of time to start before health checks begin counting failures.
You can check the health status with:
docker compose ps
A healthy container should show a status similar to:
NAME        IMAGE                              STATUS
node-app    yourusername/node-docker-app:latest   Up ... (healthy)
11. Conclusion
In this article, we explored how to containerize a Node.js application with Docker and build a CI/CD pipeline using GitHub Actions. We started by creating a Dockerfile for the Node.js application and used a multi-stage build to separate the application preparation process from the production runtime image. We then configured environment variables, built and tested the Docker image locally, and published the image to Docker Hub through an automated GitHub Actions workflow.
We also covered how the published Docker image can be deployed to a Virtual Private Server and managed using Docker Compose. The deployment process can pull new images from Docker Hub and recreate the running container with the latest application version. Finally, we added a health-check endpoint and Docker health checks to provide a simple way to verify that the application is running correctly.
The resulting workflow provides a foundation for continuous delivery: we push changes to GitHub, GitHub Actions builds the Docker image and publishes it to Docker Hub, and the VPS can retrieve and run the latest version.
12. Download the Source Code
This article explored the process of packaging a Node.js application with Docker and deploying it using GitHub Actions.
You can download the full source code of this example here: containerize a node js app with docker and deploy with github actions