

When you install Debian 13, one question decides how you’ll administer the box for years: whether to give root a password. Leave it blank and your first user gets sudo, so admin work goes through your own account from the first login. Set one and that user cannot use sudo at all until you fix it by hand, and on a server the sudo package is not even installed. The server or desktop choice comes later on one checklist screen, whose default installs GNOME without an SSH server.
This guide shows how to install Debian 13 Trixie step by step from a USB stick with the graphical installer, then the first jobs after boot: sudo, updates, SSH, a UFW firewall and a static IP. We ran it three times on a UEFI machine with Secure Boot on: a GNOME desktop with a root password, a headless server without one, and a headless server with one. Every screenshot and number below comes from those installs, including the static IP step that broke DNS until we added one package.
Current as of October 2026.
1. What you need
A Debian 13 install needs less hardware than most people budget for, so size the machine for what it will run afterwards rather than for the installer. The figures below come from our two installs, which means they show the real gap between a server and a desktop instead of a vendor minimum. We’d have these ready before starting:
- A USB stick of 2 GB or more: the netinst ISO is 756 MiB, and the full DVD image is 3.7 GB if you install offline.
- A 64-bit PC with UEFI or legacy BIOS: we tested UEFI with Secure Boot on, and the signed installer booted without touching firmware settings.
- Memory for the role: our minimal server sat at 309 MB used three minutes after boot, while the GNOME install used 1,144 MB at 21 minutes of uptime with a desktop session logged in, so give a desktop 4 GB.
- Disk for the role: the server used 1.1 GB and the GNOME desktop 4.7 GB of root, but the installer’s guided LVM screen gave 8.5 GB as the minimum for its recipe, so 20 GB is a sensible floor.
- A network connection, ideally wired: netinst pulls every package after the base system from a mirror, and a cable is the setup the installer configures without a single question.
We installed Debian 13.7, the September 2026 point release, from the netinst image. Any stick from a known brand works, because the installer reads it once and is done. If you’re buying one anyway, our USB flash drive picks lean toward small, durable sticks, which suits an installer that lives on a keyring, although that list was written for a different job and doesn’t benchmark the drives.
2. Download and verify the Debian 13 ISO
Grab the netinst image unless you have no network at install time. It is a quarter of the DVD’s size, it installs current packages straight from the mirror, and it produces the same system. The commands below pick up whatever point release is current, so they keep working after the next update. If you are on Windows, download the same files from debian.org/distrib/netinst instead.
Look up the current ISO name from the checksum file instead of typing it. Debian has shipped a new point release roughly every two months during 2026, so a hard-coded file name stops working within weeks. Download the image together with its checksums and signature:
DEB_ISO=$(wget -qO- https://cdimage.debian.org/debian-cd/current/amd64/iso-cd/SHA256SUMS | grep -oE "debian-[0-9.]+-amd64-netinst\.iso")
echo "${DEB_ISO}"
wget "https://cdimage.debian.org/debian-cd/current/amd64/iso-cd/${DEB_ISO}" \
  https://cdimage.debian.org/debian-cd/current/amd64/iso-cd/SHA256SUMS \
  https://cdimage.debian.org/debian-cd/current/amd64/iso-cd/SHA256SUMS.sign
The echo has to print exactly one file name. An empty line means the mirror path moved or your network blocks cdimage.debian.org, so stop there instead of handing wget a blank name. Ours printed the current point release.
debian-13.7.0-amd64-netinst.isoA checksum only proves the download was not corrupted, while the signature proves the checksum file came from Debian. Check both, because a tampered mirror could serve a checksum file that matches a modified image, and only the signature catches that. Import the Debian CD signing key by its full fingerprint rather than a short ID:
sha256sum -c --ignore-missing SHA256SUMS
gpg --keyserver keyring.debian.org --recv-keys DF9B9C49EAA9298432589D76DA87E80D6294BE9B
gpg --verify SHA256SUMS.sign SHA256SUMS
You want OK next to the ISO and Good signature from the Debian CD signing key. The three lines about a new keybox and trustdb only appear the first time gpg runs for your user.
debian-13.7.0-amd64-netinst.iso: OK
gpg: directory '/home/valentine/.gnupg' created
gpg: keybox '/home/valentine/.gnupg/pubring.kbx' created
gpg: /home/valentine/.gnupg/trustdb.gpg: trustdb created
gpg: key DA87E80D6294BE9B: public key "Debian CD signing key <[email protected]>" imported
gpg: Total number processed: 1
gpg:               imported: 1
gpg: Signature made Sat 12 Sep 2026 12:20:46 PM EDT
gpg:                using RSA key DF9B9C49EAA9298432589D76DA87E80D6294BE9B
gpg: Good signature from "Debian CD signing key <[email protected]>" [unknown]
gpg: WARNING: This key is not certified with a trusted signature!
gpg:          There is no indication that the signature belongs to the owner.
Primary key fingerprint: DF9B 9C49 EAA9 2984 3258  9D76 DA87 E80D 6294 BE9B
The trust warning is normal, because you have not signed Debian’s key yourself. What matters is that the fingerprint on the last line matches the one you imported. If sha256sum prints FAILED, delete the ISO and download it again rather than writing it to a stick.
3. Write the ISO to a USB stick
The Debian ISO is a hybrid image, so a raw copy with dd is all it needs. No partitioning tool and no “ISO mode” toggle are involved. The only risk is the target device, because dd overwrites whatever you point it at without asking. Plug the stick in and list the disks first:
lsblk -d -o NAME,SIZE,MODEL,SERIAL,TRANPick the device by its size and model, never by its letter alone, because sdX names shift when another disk is plugged in. On our lab machine the 2 GB stick was sda, and on a laptop a real stick also shows usb in the TRAN column. Getting this wrong wipes a data disk, so if two devices look alike, unplug the stick, run lsblk again and see which line disappears.
NAME SIZE MODEL         SERIAL      TRAN
sda    2G QEMU HARDDISK drive-scsi1
sdb    4G QEMU HARDDISK drive-scsi2
sr0    4M QEMU DVD-ROM  QM00003     ata
vda   40G                           virtio
Write the image, replacing /dev/sdX with your stick. The conv=fsync flag makes dd wait until the data is really on the stick, so it’s safe to pull when the command returns. The oflag=direct option skips the page cache, which keeps the progress counter honest instead of racing ahead of the stick:
sudo dd if="${DEB_ISO}" of=/dev/sdX bs=4M status=progress conv=fsync oflag=directThe copy took under a second on our virtual disk. A real stick is far slower, because its write speed is the bottleneck, so expect a few minutes.
189+0 records in
189+0 records out
792723456 bytes (793 MB, 756 MiB) copied, 0.914475 s, 867 MB/s
If you’d rather use a GUI or you’re on a Mac, the bootable USB guide for Linux and macOS covers balenaEtcher and the macOS dd variant. To keep Debian next to other installers on one stick, Ventoy boots ISOs copied onto it as plain files, so you never rewrite the stick for the next release.
4. Boot the Debian installer
Boot from the stick through your firmware’s one-time boot menu (usually F12, F11 or Esc during power-on). On UEFI you land in the Debian installer menu, and the version string at the top confirms which point release you wrote. We left Secure Boot on, so you don’t need to touch that firmware setting: the signed shim and kernel booted without complaint, and mokutil --sb-state on the finished install still reported SecureBoot enabled.

Pick Graphical install. The plain Install entry runs the same steps in a text interface and produces an identical system, so it is only worth choosing on a serial console or on graphics the installer can’t drive. Both entries ask the same questions in the same order, which is why the rest of this guide applies to either.
5. Choose language, location and keyboard
The first three screens set the installer language, your country and the keymap. The language you pick here also becomes the system locale, so choose the one you want in error messages and man pages, not just during setup. Changing it later means reconfiguring locales by hand, which is more work than picking right now:

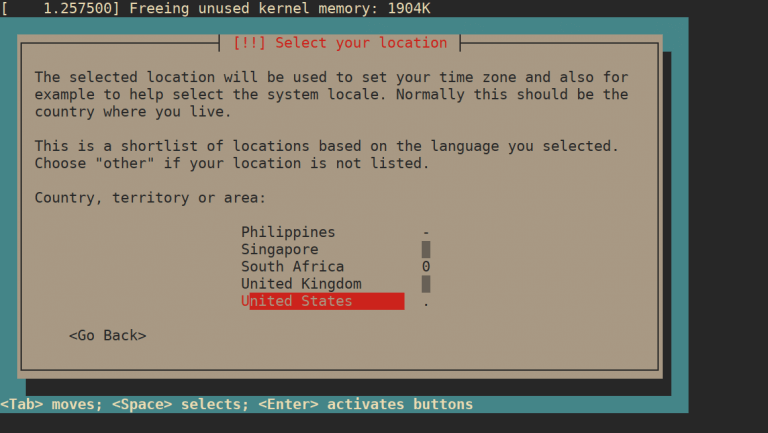
Country does two jobs: it filters the time zone list you’ll see later and suggests the closest package mirror. That mirror matters more on netinst, because every package after the base system comes from it. If yours isn’t in the short list, choose other to see every country:

The keyboard screen defaults to a layout that matches your language. Accept it unless your physical keyboard differs, because a wrong layout makes the passwords you type a few screens later unexpectedly hard to reproduce at the login prompt. The graphical installer has no box to test keys in, so if you use an unusual layout, type your passwords with the Show Password in Clear box ticked and check them on screen.
6. Set the hostname
The installer then loads extra components from the stick and configures the network with DHCP on its own. On a wired connection you won’t see a network screen at all, just a progress bar, and the hostname prompt can take a little while to appear. Most of that pause is the installer reading components from the stick, so do not mistake it for a hang:

Use a short, single-word name that says what the machine does, like web01 or nas, because it ends up in your shell prompt, your logs and /etc/hosts. The next screen asks for a domain name. Leave it blank on a home network or a lab, and fill it in only when the machine joins a real DNS domain you manage.
7. Decide on the root password and create your user
This is the screen that decides how you’ll get root later, and the installer explains the choice in its own text. Set a root password and you log in as root for admin work. Leave it empty and your first user is added to the sudo group instead. What the text doesn’t say is that the result also depends on the software you pick later, which is why we tested three combinations:

- Root password left empty: root is locked (
passwd -S rootreportsL) andsudo whoamireturnsrootstraight after first boot. This is the path we’d pick for almost every machine. - Root password set, server install: the
sudopackage is not installed at all, so the first attempt prints-bash: sudo: command not found. Debian 13 marks sudo as optional, and only the empty-root path or a desktop task pulls it in. - Root password set, desktop install: sudo arrives with the desktop task, but your user is not in the
sudogroup, so every command fails with “not in the sudoers file”. Section 11 fixes both cases with one command.
A locked root with sudo is easier to audit, because every admin action is logged against a named user. Set a root password only if you have a reason to want a separate root login, such as a shared box where the admin account shouldn’t be anyone’s daily login. Next, enter your full name and pick the username:

Usernames must start with a lowercase letter, while the full name from the screen before only appears in places like the GNOME login screen, so it can be anything. After the password screen comes the clock, and the time zone list is already narrowed to the country you picked in step 5:

If your zone is missing, the country choice was wrong, and the only way back is Go Back to the language step. You do not need to set the time itself, because the installed system syncs its clock over NTP as soon as it has a network. We checked that later with timedatectl, and it reported a synchronized clock on first boot.
8. Partition the disk
Pick the partitioning method by what the machine is for, because the choice is hard to undo once data lives on the disk:
- A server, or a desktop you will keep for years: Guided with LVM. Growing root or adding a second disk later takes two commands instead of a repartition.
- A single-purpose box or a VM you’ll rebuild: Guided, use entire disk. One layer fewer, and nothing you would miss.
- A laptop that leaves the house: Guided with encrypted LVM. You type a passphrase at every boot, which is the price of a stolen laptop being useless to the thief.
- Dual boot or a hand-made layout: Manual, and only when you already know the partitions you want.
We used guided LVM on every install. A fifth option, “use the largest continuous free space”, appears at the top only when the disk has unpartitioned space. A disk that another OS fills completely won’t show it, so shrink that OS from its own tools first if it has to survive, then come back to this screen:

The disk list surprised us in a good way. The USB stick the installer booted from didn’t appear at all, only the 34.4 GB target disk, so on a machine with one internal drive you can’t wipe the installer by accident. On a machine with several disks, check the size and model before you continue, because this is the disk that gets erased:

Debian 13 offers five partitioning schemes. All files in one partition is the right default for nearly everyone, because it never leaves one volume full while another sits empty. The Small-disk scheme exists for targets under 10 GB:

Separate /var and /srv volumes make sense on a server where logs or data could fill the disk, but with LVM you can carve those out later instead. Two more prompts follow: one to write the partition table so LVM can be configured, and one asking how much of the volume group to use, where the default max is right unless you want free space for snapshots.
The final confirmation caught us out. “Write the changes to disks?” defaults to No, and pressing Continue without switching to Yes drops you back to the partition overview instead of installing. Select Yes first:

On a disk that already holds an LVM install, the installer asks once more whether to remove the old logical volumes and volume group, also defaulting to No. We met that prompt on our second run, which reused the first install’s disk. The base system then took about a minute on our VM. Questions on the package mirror follow (deb.debian.org is the right choice for most people), then an optional HTTP proxy and the popularity contest.
9. Choose server or desktop in tasksel
Software selection is where a Debian install becomes a server or a desktop, and its defaults suit neither perfectly. By default, Debian desktop environment, GNOME and standard system utilities are ticked, and SSH server is not. Eight desktops are on offer: GNOME, Xfce, GNOME Flashback, KDE Plasma, Cinnamon, MATE, LXDE and LXQt. Tick the boxes by what the machine will do:
- A headless server: SSH server and standard system utilities, nothing else. This is the leanest useful system, at 326 to 327 packages in our runs.
- A desktop you’ll also reach remotely: one desktop, SSH server and standard system utilities. Ticking SSH now saves a trip to the keyboard later.
- A desktop that never accepts connections: the default selection is fine, and you can still add
openssh-serverwith apt if that changes.
For a headless server, clear the desktop lines and tick SSH server, leaving standard system utilities on. This is the exact selection from our server run:

For a desktop, keep GNOME (or swap it for another desktop) and tick SSH server as well if you’ll ever manage the machine remotely. This is the selection we used for the desktop install:

Watch the keyboard here. In this list Enter toggles the highlighted item instead of pressing Continue, which is how our first run silently unticked SSH server and sat on this screen. Use Space to tick, then Tab to Continue. The difference in what gets installed is large. On our last server run the software step was finished about 30 seconds after Continue, and the installer reached its final screen about a minute after it, leaving 326 packages. The GNOME run fetched 1,383 files by the installer’s own counter, took roughly 20 minutes on our connection (timed between two screenshots, so treat it as approximate) and left 1,584 packages.
10. Finish the install and boot Debian 13
On UEFI the installer put GRUB on the EFI system partition without asking anything, then showed the completion screen. Remove the USB stick before you press Continue, otherwise many machines boot straight back into the installer:

A server install boots to a text console login, where you sign in with the user you created. There’s no banner or welcome message, and from here you’ll do everything else over SSH:

A desktop install boots to the GDM login screen instead, and the first GNOME login opens a short welcome tour that you can skip. GNOME runs on Wayland by default here:

The rest of this guide runs in a terminal. On the desktop, open Terminal from the app grid. On the server, connect over SSH from your workstation instead of typing at the console, since commands are far easier to paste into an SSH session.
11. Fix sudo if you set a root password
Skip this section if you left the root password empty, because your user already has sudo. If you set one, what you see depends on the install, and the quickest way to find out is to try:
sudo whoamiOn our server installed with a root password, bash couldn’t even find the command, because the package was never installed:
-bash: sudo: command not foundOn the GNOME install made with the same root password choice, sudo existed but refused, since the desktop task installs the package without adding you to the group:
valentine is not in the sudoers file.One command fixes both cases. It installs sudo (apt just reports it as already the newest version on a desktop) and adds your user to the group. su asks for the root password you set during installation; swap valentine for your username:
su - -c "apt install -y sudo && usermod -aG sudo valentine"This is how it looked on the server console, from the failed attempt to the package install:

Group membership is read at login, so the shell you ran this in still has no sudo rights. Log out completely (or close the SSH session) and log back in, then confirm:
id valentine
sudo whoami
The group list now includes 27(sudo), and sudo answers as root:
uid=1000(valentine) gid=1000(valentine) groups=1000(valentine),24(cdrom),25(floppy),27(sudo),29(audio),30(dip),44(video),46(plugdev),100(users),101(netdev)
root
The id valentine line reads the group database, so it lists 27(sudo) as soon as usermod runs. The real test is sudo whoami: if it still refuses, you are in the old session, so log out once more. Desktop users have to sign out of GNOME entirely; opening a new terminal window is not enough.
12. Update Debian and check SSH
Because netinst pulls packages from the mirror during installation, a fresh install is usually current already. Run the update anyway, since it also confirms your mirror and DNS work:
sudo apt update && sudo apt upgrade -yOur desktop install, finished minutes earlier, had nothing to upgrade, which is normal for netinst. A DVD install made from an older image would show a long list here instead, since the DVD carries the packages it was built with.
Hit:1 http://security.debian.org/debian-security trixie-security InRelease
Hit:2 http://deb.debian.org/debian trixie InRelease
Hit:3 http://deb.debian.org/debian trixie-updates InRelease
All packages are up to date.
Summary:
  Upgrading: 0, Installing: 0, Removing: 0, Not Upgrading: 0
If you ticked SSH server in tasksel, OpenSSH is already enabled and running, and you can confirm that before relying on it from another machine:
sudo systemctl status ssh --no-pagerLook for enabled on the Loaded line and active (running) below it (journal lines trimmed):
● ssh.service - OpenBSD Secure Shell server
     Loaded: loaded (/usr/lib/systemd/system/ssh.service; enabled; preset: enabled)
     Active: active (running) since Mon 2026-10-19 08:54:59 EDT; 2min 13s ago
 Invocation: 5aa6306c7468418ea69601f0833e5a2e
       Docs: man:sshd(8)
             man:sshd_config(5)
    Process: 853 ExecStartPre=/usr/sbin/sshd -t (code=exited, status=0/SUCCESS)
   Main PID: 864 (sshd)
If you skipped it, sudo apt install -y openssh-server adds it later and starts it straight away. Before you expose port 22, check what Debian’s defaults allow, because they are tuned for convenience on a LAN rather than for a server facing the internet. Print the effective settings:
sudo sshd -T | grep -E "^(port|permitrootlogin|passwordauthentication|pubkeyauthentication) "Password logins are on, and root can log in only with a key, which is what without-password means despite its name.
port 22
permitrootlogin without-password
pubkeyauthentication yes
passwordauthentication yes
That’s reasonable on a LAN. Anything reachable from the internet gets a steady stream of password guesses, though, so copy your key over and switch PasswordAuthentication off. The SSH server setup for Debian walks through keys and hardening.
13. Turn on a firewall with UFW
Debian 13 installs no firewall rules at all. The nftables package is present on both installs, but its service is disabled and nft list ruleset printed nothing, and neither UFW nor firewalld is installed. UFW is the quickest way to get a default-deny policy. Allow SSH before you enable it, or a remote session will lock you out:
sudo apt install -y ufw
sudo ufw default deny incoming
sudo ufw default allow outgoing
sudo ufw allow ssh
sudo ufw enable
ufw enable warns that it may disrupt existing SSH connections. Answer y, which is safe because the SSH rule is already in place, then check the result.
sudo ufw status verboseIncoming traffic is denied except port 22 over IPv4 and IPv6:
Status: active
Logging: on (low)
Default: deny (incoming), allow (outgoing), disabled (routed)
New profiles: skip

To                         Action      From
--                         ------      ----
22/tcp                     ALLOW IN    Anywhere
22/tcp (v6)                ALLOW IN    Anywhere (v6)
Open more ports as you add services, for example sudo ufw allow 443/tcp for HTTPS. Always prefix ufw with sudo, because it lives in /usr/sbin, which is not on a regular user’s PATH on Debian. A bare ufw returned “command not found” for us even after installation, so the error does not mean the package is missing.
14. Set a static IP address
How you set a static IP depends on which install you chose, because the two use different network stacks. The server writes its interface into /etc/network/interfaces and runs dhcpcd through ifupdown, while the desktop leaves that file with only the loopback entry and hands the interface to NetworkManager as “Wired connection 1”. Check your interface name with ip -br a first; ours was ens18, not the eth0 older guides use.
Pick an address outside your router’s DHCP pool, which you’ll find in the router’s DHCP or LAN settings, so the router never hands the same address to another device. Our server leased 10.0.1.110 from DHCP, and we moved it to 10.0.1.50, which sits outside that pool. Because the address changes, expect to reconnect at the end of either method.
Server: /etc/network/interfaces
Install resolvconf first, while DHCP still gives you working DNS. Without it, the dns-nameservers line below is silently ignored, so the server boots with an address but nothing to resolve names. That is exactly how our server ended up after the first attempt. Straight after the install, our /etc/resolv.conf was a symlink with no name server lines in it, so go straight on to the edit and the reboot rather than running apt in between:
sudo apt install -y resolvconfOpen the interfaces file:
sudo vim /etc/network/interfacesChange the iface ens18 inet dhcp line into a static block with your address, prefix, gateway and DNS servers. Keep the allow-hotplug line as it is, because that’s what brings the interface up at boot. This is the complete file from our server:
# This file describes the network interfaces available on your system
# and how to activate them. For more information, see interfaces(5).

source /etc/network/interfaces.d/*

# The loopback network interface
auto lo
iface lo inet loopback

# The primary network interface
allow-hotplug ens18
iface ens18 inet static
    address 10.0.1.50/24
    gateway 10.0.1.1
    dns-nameservers 1.1.1.1 9.9.9.9
Applying the change is where Debian 13 surprised us. We tried three ways before one worked:
sudo systemctl restart networkingchanged nothing. The interface is markedallow-hotplug, so the service left it up, and the route still saidproto dhcp.sudo ifdown ens18followed bysudo ifup ens18, run after the edit, leftdhcpcdrunning, because ifdown then reads the new static stanza and never stops the DHCP client. Running ifdown before editing works, but it cuts an SSH session.- A reboot applied the static address cleanly, and with
resolvconfin place DNS came up too. Without it, DNS died, which is the error further down.
So reboot once the file is saved. Your SSH session drops, and the server comes back on the new address. If you mistype the address or gateway, it comes back unreachable over the network, so make sure you can get to its console first:
sudo systemctl rebootGive it a minute, then reconnect to the new address rather than the old lease:
ssh [email protected]Once you’re in, confirm the address, the route, DNS and that no DHCP client is left running:
ip -br a show ens18
ip r
cat /etc/resolv.conf
pgrep -a dhcpcd || echo "no dhcpcd running"
This is from our fresh server, done in exactly this order: resolvconf, the edit, the reboot. A healthy result has a static route with no proto dhcp, the two name servers from your config and no dhcpcd:
ens18            UP             10.0.1.50/24 fe80::be24:11ff:fea1:2c50/64
default via 10.0.1.1 dev ens18 onlink
10.0.1.0/24 dev ens18 proto kernel scope link src 10.0.1.50
# Dynamic resolv.conf(5) file for glibc resolver(3) generated by resolvconf(8)
#     DO NOT EDIT THIS FILE BY HAND -- YOUR CHANGES WILL BE OVERWRITTEN
nameserver 1.1.1.1
nameserver 9.9.9.9
no dhcpcd running
If dhcpcd still shows up, the interfaces file still has a dhcp line somewhere, often a second iface stanza that a copy and paste left behind. Remove it and reboot again, since a running DHCP client will keep pulling its own address and DNS servers back in.
Error: “Temporary failure resolving ‘deb.debian.org'”
This is what apt update printed after we switched to static without resolvconf. On shutdown, dhcpcd had emptied /etc/resolv.conf down to its comment lines, and nothing read the dns-nameservers line. The server had a working address and route, so the failure looked like a broken mirror rather than missing DNS:
Err:1 http://deb.debian.org/debian trixie InRelease
  Temporary failure resolving 'deb.debian.org'
Warning: Failed to fetch http://deb.debian.org/debian/dists/trixie/InRelease  Temporary failure resolving 'deb.debian.org'
Warning: Some index files failed to download. They have been ignored, or old ones used instead.
Put a name server in place by hand so apt works again, then install resolvconf and reboot so the dns-nameservers line takes over:
echo "nameserver 1.1.1.1" | sudo tee /etc/resolv.conf
sudo apt update
sudo apt install -y resolvconf
sudo systemctl reboot
After the reboot, /etc/resolv.conf becomes a symlink to /run/resolvconf/resolv.conf carrying the servers from your interfaces file. From then on, changing DNS means editing the dns-nameservers line rather than resolv.conf, because resolvconf rewrites that file at every boot.
Desktop: NetworkManager with nmcli
On the GNOME install, NetworkManager owns the interface, so leave /etc/network/interfaces alone and change the connection profile instead. Settings, Network does the same job, but nmcli is quicker. Use the profile name that nmcli con show lists, which on our install was “Wired connection 1”. The second command switches the address at once, so over SSH your session drops as soon as the address changes; run it from the desktop’s own terminal, or reconnect to the new address afterwards:
sudo nmcli con mod "Wired connection 1" ipv4.addresses 10.0.1.50/24 ipv4.gateway 10.0.1.1 ipv4.dns "1.1.1.1 9.9.9.9" ipv4.method manual
sudo nmcli con up "Wired connection 1"
The change applies immediately, with no reboot and no extra package. We kept the existing address on the desktop, which is why our SSH session survived this output:
Connection successfully activated (D-Bus active path: /org/freedesktop/NetworkManager/ActiveConnection/3)Read the profile back to confirm it’s static:
nmcli -g ipv4.method,ipv4.addresses,ipv4.gateway,ipv4.dns con show "Wired connection 1"You should see manual followed by your address, gateway and DNS servers:
manual
10.0.1.50/24
10.0.1.1
1.1.1.1,9.9.9.9
NetworkManager also rewrote /etc/resolv.conf with the new servers on its own. That’s why the desktop path never hit the DNS problem the server did, and why it needs no extra package.
15. Install everyday tools and set the time zone
A minimal server lacks a few tools you’ll reach for in the first hour, such as a full Vim, Git and htop. Install them in one go:
sudo apt install -y vim curl wget git htop tmux net-toolsThat added 20 packages on our server and 11 on the GNOME install, which already had some of them. These are the versions Debian 13 ships. They stay at these major versions for the life of the release, with security fixes backported, so check them against any tool that needs something newer.
git version 2.47.3
VIM - Vi IMproved 9.1 (2024 Jan 02, compiled May 23 2025 00:48:59)
curl 8.14.1 (x86_64-pc-linux-gnu) libcurl/8.14.1 OpenSSL/3.5.7 zlib/1.3.1 brotli/1.1.0 zstd/1.5.7 libidn2/2.3.8 libpsl/0.21.2 libssh2/1.11.1 nghttp2/1.64.0 nghttp3/1.8.0 librtmp/2.3 OpenLDAP/2.6.10
GNU Wget 1.25.0 built on linux-gnu.
tmux 3.5a
htop 3.4.1
Python 3.13.5
The time zone comes from the installer’s country choice. To change it, pass a zone name from timedatectl list-timezones:
sudo timedatectl set-timezone Europe/London
timedatectl
Check the Time zone line, and that NTP is active and the clock synchronized:
               Local time: Mon 2026-10-19 13:58:15 BST
           Universal time: Mon 2026-10-19 12:58:15 UTC
                 RTC time: Mon 2026-10-19 12:58:15
                Time zone: Europe/London (BST, +0100)
System clock synchronized: yes
              NTP service: active
          RTC in local TZ: no
If you rename the machine later with sudo hostnamectl set-hostname, edit the 127.0.1.1 line in /etc/hosts as well, because hostnamectl leaves the old name there. On our server every sudo command afterwards printed sudo: unable to resolve host web01: Name or service not known until the hosts file matched; the GNOME install didn’t complain, since it resolves its own name another way.
For the next layer of setup, from repositories to unattended upgrades, see our things to do after installing Debian 13. If you’re moving an existing Bookworm box instead of reinstalling, the Debian 12 to 13 upgrade keeps your data in place.
Server or desktop: what each install costs
We measured the installs on the same 4 GB, 2 vCPU VM, so the difference below is the tasksel choice. Disk and package counts were taken at first boot; the RAM figures carry their timing, because a desktop’s memory use climbs after login. RAM is the “used” column from free -m, and disk is what df -h / reported for the root volume.
| Measured | Server (SSH + standard utilities) | Desktop (GNOME + SSH + standard) |
|---|---|---|
| Packages installed | 327 (empty root password), 326 (root password set, no sudo) | 1,584 |
| Root filesystem used | 1.1 GB | 4.7 GB |
| RAM used | 309 MB at 3 minutes, 296 MB at 7 minutes | 735 MB with only the GDM login screen up, 1,144 MB at 21 minutes of uptime, logged in to GNOME |
| Tasksel step duration | About 30 seconds (timestamped screenshots) | Roughly 20 minutes, 1,383 files fetched (observed) |
| Network stack | ifupdown with dhcpcd | NetworkManager |
| Static IP change applies | After a reboot, with resolvconf | Immediately, with nmcli |
| Firewall after install | None | None |
| Graphical session | None | GNOME Shell 48.7 on Wayland |
Pick the install by where the machine will live:
- It runs services and you manage it over SSH: the server install. It boots in a fraction of the RAM and leaves almost the whole disk free.
- Someone sits in front of it every day: the GNOME install with SSH ticked, so you can still fix it from another machine.
- It is a lab VM you’ll throw away: the server install again, since its software step took about 30 seconds against roughly 20 minutes for GNOME.
Where the server falls short is networking ergonomics: static addressing needs the extra resolvconf package and a reboot, which is easy to get wrong over SSH. The desktop’s weak spot is the tasksel default itself, because it skips the SSH server and leaves a fresh workstation unreachable until you install openssh-server. You can always add task-gnome-desktop to a server later, while stripping GNOME back out leaves residue, so when in doubt start small. Neither install ships with firewall rules, so the UFW step applies to both.




Thank you, that was really helpful!