

A full OpenShift cluster on one KVM host no longer needs a bastion VM, a PXE server or HAProxy. The agent-based installer boots every node from a single ISO. The dnsmasq instance that libvirt runs for the network hands out the DHCP leases and DNS records. Keepalived inside the cluster holds the API and ingress addresses. What is left for you is one network definition, two YAML files and a virt-install loop.
This guide deploys OpenShift Container Platform on KVM and libvirt with three control plane nodes and one worker. A second worker joins after install with oc adm node-image create. Then the image registry gets NFS storage, a sample app gets built and exposed, and workloads move off the control plane. It replaces our older PXE and HAProxy walkthrough. Every command below was run on a Rocky Linux 10.2 KVM host against OpenShift 4.22.15 in October 2026, and the errors at the end are the ones that run produced.
What the lab looks like
Everything lives on one NAT network, 192.168.100.0/24, which libvirt creates on the host. The cluster is called ocp4 under the base domain example.com, so the API answers at api.ocp4.example.com and apps land under *.apps.ocp4.example.com. Two addresses are virtual IPs, not machines. OpenShift moves them between nodes with keepalived.
| Name | Role | IP address | MAC address | vCPU | RAM |
|---|---|---|---|---|---|
| kvm01 | KVM host and libvirt gateway | 192.168.100.1 | n/a | 16 threads | 128 GB |
| api VIP | API and api-int | 192.168.100.5 | n/a | n/a | n/a |
| ingress VIP | *.apps wildcard | 192.168.100.7 | n/a | n/a | n/a |
| master01 | Control plane (rendezvous host) | 192.168.100.11 | 52:54:00:4f:00:11 | 6 | 20 GB |
| master02 | Control plane | 192.168.100.12 | 52:54:00:4f:00:12 | 6 | 20 GB |
| master03 | Control plane | 192.168.100.13 | 52:54:00:4f:00:13 | 6 | 20 GB |
| worker01 | Compute | 192.168.100.21 | 52:54:00:4f:00:21 | 4 | 16 GB |
| worker02 | Compute, added after install | 192.168.100.22 | 52:54:00:4f:00:22 | 4 | 16 GB |
The Red Hat agent-based installer docs recommend 8 vCPUs, 16 GB of RAM and 120 GB of disk for every node in compact and HA clusters. Our host had 16 threads, so the five VMs share 26 vCPUs. That is overcommitted and below the recommendation, and the cluster still installed and ran builds. Treat it as a floor for a lab, not a sizing guide. The RAM is the hard limit: 92 GB of guest memory on a 128 GB host leaves room for the host itself and nothing else.
Before you start
The host needs hardware virtualization exposed to it. A bare-metal box works. So does a cloud VM with nested virtualization; ours was an AWS r8i.4xlarge (16 vCPU, 128 GB) launched with nested virtualization enabled, running the Rocky Linux 10 AMI. You also need:
- RHEL 10, Rocky Linux 10, AlmaLinux 10 or a current Fedora on the host, with sudo access
- About 600 GB of free disk for five thin-provisioned 120 GB qcow2 images
- A Red Hat account and the pull secret from console.redhat.com, saved as
~/.openshift/pull-secreton the host - Outbound internet from the host, because the nodes pull release images from quay.io and registry.redhat.io
No subscription is needed for the install itself. The cluster runs as a 60-day self-support trial until you attach it to a subscription.
Install KVM and libvirt on the host
Check that the CPU flags reach the host first. Any number above zero is fine:
grep -cE 'vmx|svm' /proc/cpuinfoOur host printed 32, two matching lines for each of its 16 threads:
32Install the hypervisor stack. The nmstate package is only used by the installer when you give nodes static network configs, but it costs nothing to have it ready:
sudo dnf -y install qemu-kvm libvirt virt-install guestfs-tools libvirt-client nmstate tar jq bind-utilsRocky 10 ships the modular libvirt daemons, so enable their sockets rather than the old monolithic libvirtd:
sudo systemctl enable --now virtqemud.socket virtnetworkd.socket virtstoraged.socket virtnodedevd.socketThen let libvirt check the host:
sudo virt-host-validate qemuEvery line that matters passed. The two warnings are about PCI passthrough and confidential computing, neither of which OpenShift needs here:
  QEMU: Checking for hardware virtualization                                 : PASS
  QEMU: Checking if device '/dev/kvm' exists                                 : PASS
  QEMU: Checking if device '/dev/kvm' is accessible                          : PASS
  QEMU: Checking if device '/dev/vhost-net' exists                           : PASS
  QEMU: Checking if device '/dev/net/tun' exists                             : PASS
  QEMU: Checking for cgroup 'cpu' controller support                         : PASS
  QEMU: Checking for cgroup 'cpuacct' controller support                     : PASS
  QEMU: Checking for cgroup 'cpuset' controller support                      : PASS
  QEMU: Checking for cgroup 'memory' controller support                      : PASS
  QEMU: Checking for cgroup 'devices' controller support                     : PASS
  QEMU: Checking for cgroup 'blkio' controller support                       : PASS
  QEMU: Checking for device assignment IOMMU support                         : WARN (No ACPI DMAR table found, IOMMU either disabled in BIOS or not supported by this hardware platform)
  QEMU: Checking for secure guest support                                    : WARN (None of SEV, SEV-ES, SEV-SNP, TDX available)
Our KVM install guide for Rocky and AlmaLinux covers bridges, storage pools and virt-manager if you want more than the minimum.
Create the cluster network with DHCP and DNS
This one file replaces the bastion. It defines a NAT network with fixed DHCP leases for each node MAC, A records for the API and every node, and a dnsmasq wildcard for *.apps. Libvirt builds matching PTR records from the dns host entries, which OpenShift wants for node names. Open the file:
vim /tmp/ocp4-net.xmlPaste the network definition:
<network xmlns:dnsmasq='http://libvirt.org/schemas/network/dnsmasq/1.0'>
  <name>ocp4</name>
  <forward mode='nat'/>
  <bridge name='virbr-ocp4' stp='on' delay='0'/>
  <domain name='ocp4.example.com' localOnly='yes'/>
  <dns>
    <host ip='192.168.100.5'>
      <hostname>api.ocp4.example.com</hostname>
      <hostname>api-int.ocp4.example.com</hostname>
    </host>
    <host ip='192.168.100.11'>
      <hostname>master01.ocp4.example.com</hostname>
    </host>
    <host ip='192.168.100.12'>
      <hostname>master02.ocp4.example.com</hostname>
    </host>
    <host ip='192.168.100.13'>
      <hostname>master03.ocp4.example.com</hostname>
    </host>
    <host ip='192.168.100.21'>
      <hostname>worker01.ocp4.example.com</hostname>
    </host>
    <host ip='192.168.100.22'>
      <hostname>worker02.ocp4.example.com</hostname>
    </host>
  </dns>
  <ip address='192.168.100.1' netmask='255.255.255.0'>
    <dhcp>
      <range start='192.168.100.100' end='192.168.100.199'/>
      <host mac='52:54:00:4f:00:11' name='master01' ip='192.168.100.11'/>
      <host mac='52:54:00:4f:00:12' name='master02' ip='192.168.100.12'/>
      <host mac='52:54:00:4f:00:13' name='master03' ip='192.168.100.13'/>
      <host mac='52:54:00:4f:00:21' name='worker01' ip='192.168.100.21'/>
      <host mac='52:54:00:4f:00:22' name='worker02' ip='192.168.100.22'/>
    </dhcp>
  </ip>
  <dnsmasq:options>
    <dnsmasq:option value='address=/apps.ocp4.example.com/192.168.100.7'/>
  </dnsmasq:options>
</network>
Define it, mark it to start at boot, and start it. libvirt keeps its own copy, so the file in /tmp is only the input:
sudo virsh net-define /tmp/ocp4-net.xml
sudo virsh net-autostart ocp4
sudo virsh net-start ocp4
Each command confirms on its own line:
Network ocp4 defined from /tmp/ocp4-net.xml

Network ocp4 marked as autostarted

Network ocp4 started
Query that dnsmasq directly at 192.168.100.1. The cluster domain goes in a variable because the next few checks all use it:
export CLUSTER_DOMAIN="ocp4.example.com"
dig +short @192.168.100.1 api.${CLUSTER_DOMAIN}
dig +short @192.168.100.1 test.apps.${CLUSTER_DOMAIN}
dig +short @192.168.100.1 master02.${CLUSTER_DOMAIN}
dig +short @192.168.100.1 -x 192.168.100.12
The API resolves to its VIP, any name under apps hits the ingress VIP, and the node record works both ways:
192.168.100.5
192.168.100.7
192.168.100.12
master02.ocp4.example.com.
Point the host at the cluster DNS
The installer runs on the host and has to resolve api.ocp4.example.com too. On RHEL-family hosts NetworkManager owns /etc/resolv.conf, so switch it to its dnsmasq plugin and forward only the cluster domain to libvirt. Everything else keeps using the upstream resolver. (Fedora uses systemd-resolved instead, and we did not test that variant.)
printf "[main]\ndns=dnsmasq\n" | sudo tee /etc/NetworkManager/conf.d/ocp4-dns.conf
echo "server=/ocp4.example.com/192.168.100.1" | sudo tee /etc/NetworkManager/dnsmasq.d/ocp4.conf
sudo systemctl reload NetworkManager
The host now answers cluster names through the local resolver:
getent hosts api.${CLUSTER_DOMAIN}Same VIP as the direct query:
192.168.100.5 api.ocp4.example.comDownload the OpenShift installer and oc
The mirror keeps a stable alias that always points at the newest stable release, including the next minor once it ships. Read the version from it. To stay on one minor, swap stable for a channel such as stable-4.22, which is the channel we actually read in the lab:
OCP_VER=$(curl -s https://mirror.openshift.com/pub/openshift-v4/x86_64/clients/ocp/stable/release.txt | awk '/^Name:/{print $2}')
echo "${OCP_VER}"
This printed the release we installed:
4.22.15Download the client and installer tarballs, then unpack only the binaries into /usr/local/bin:
cd /tmp
curl -sLO "https://mirror.openshift.com/pub/openshift-v4/x86_64/clients/ocp/${OCP_VER}/openshift-client-linux.tar.gz"
curl -sLO "https://mirror.openshift.com/pub/openshift-v4/x86_64/clients/ocp/${OCP_VER}/openshift-install-linux.tar.gz"
sudo tar -xzf openshift-client-linux.tar.gz -C /usr/local/bin oc kubectl
sudo tar -xzf openshift-install-linux.tar.gz -C /usr/local/bin openshift-install
The installer tarball is the big one at 448 MB, because it embeds the release metadata. Check both tools:
openshift-install version
oc version --client
The installer reports the release image it will deploy:
openshift-install 4.22.15
built from commit cdaf698d75d93e6ed9bf6203c988c5321a086758
release image quay.io/openshift-release-dev/ocp-release@sha256:fed788eac1c99388dd9b78dda4d6a73e39b70abb00ca918d2bb456a97187f0c1
release architecture amd64
Client Version: 4.22.15
Kustomize Version: v5.7.1
Write install-config.yaml and agent-config.yaml
The installer consumes these two files and deletes them when it builds the ISO. Keep the originals in one directory and copy them into a working directory each time. Create both directories and an SSH key for the core user on the nodes (skip the ssh-keygen line if you already have a key you want to use):
mkdir -p ~/ocp4-config ~/ocp4-install
ssh-keygen -t ed25519 -N "" -f ~/.ssh/id_ed25519
Open the install config:
vim ~/ocp4-config/install-config.yamlThis is the file we ran, with the pull secret and SSH key cut out. Paste your pull secret JSON on one line between the quotes, and the contents of ~/.ssh/id_ed25519.pub as the SSH key:
apiVersion: v1
baseDomain: example.com
metadata:
  name: ocp4
compute:
- name: worker
  replicas: 1
controlPlane:
  name: master
  replicas: 3
networking:
  networkType: OVNKubernetes
  machineNetwork:
  - cidr: 192.168.100.0/24
  clusterNetwork:
  - cidr: 10.128.0.0/14
    hostPrefix: 23
  serviceNetwork:
  - 172.30.0.0/16
platform:
  baremetal:
    apiVIPs:
    - 192.168.100.5
    ingressVIPs:
    - 192.168.100.7
pullSecret: '{"auths": ...}'
sshKey: 'ssh-ed25519 AAAA... josphat@kvm01'
The platform: baremetal block is what removes the load balancer. With platform: none the installer expects you to provide HAProxy and full DNS yourself, which is the old bastion design. Here OpenShift runs keepalived and keeps the two VIPs alive on healthy nodes. The machineNetwork CIDR must contain both VIPs.
Now the agent config. It maps each MAC to a hostname and role and names the rendezvous host, the control plane node that runs the temporary assisted service during install:
vim ~/ocp4-config/agent-config.yamlThe file as executed:
apiVersion: v1beta1
kind: AgentConfig
metadata:
  name: ocp4
rendezvousIP: 192.168.100.11
hosts:
- hostname: master01
  role: master
  interfaces:
  - name: enp1s0
    macAddress: 52:54:00:4f:00:11
  rootDeviceHints:
    deviceName: /dev/vda
- hostname: master02
  role: master
  interfaces:
  - name: enp1s0
    macAddress: 52:54:00:4f:00:12
  rootDeviceHints:
    deviceName: /dev/vda
- hostname: master03
  role: master
  interfaces:
  - name: enp1s0
    macAddress: 52:54:00:4f:00:13
  rootDeviceHints:
    deviceName: /dev/vda
- hostname: worker01
  role: worker
  interfaces:
  - name: enp1s0
    macAddress: 52:54:00:4f:00:21
  rootDeviceHints:
    deviceName: /dev/vda
There is no networkConfig section because DHCP hands out the addresses. The rootDeviceHints pin the install to the virtio disk, so the CD-ROM device that holds the ISO can never be picked as the target.
Build the agent ISO
Copy the configs into the working directory and generate the image:
cp ~/ocp4-config/*.yaml ~/ocp4-install/
cd ~/ocp4-install
openshift-install agent create image --dir . --log-level=info
It pulled the RHCOS base ISO out of the release payload and finished in 55 seconds:
level=info msg=Configuration has 3 master replicas, 0 arbiter replicas, and 1 worker replicas
level=info msg=The rendezvous host IP (node0 IP) is 192.168.100.11
level=info msg=Extracting base ISO from release payload
level=info msg=Base ISO obtained from release and cached at [/home/josphat/.cache/agent/image_cache/coreos-x86_64.iso]
level=info msg=Consuming Install Config from target directory
level=info msg=Consuming Agent Config from target directory
level=info msg=Generated ISO at agent.x86_64.iso.
The directory now holds a 1.4 GB agent.x86_64.iso plus an auth folder with the kubeconfig and kubeadmin-password files. Back the auth folder up. It is the only admin login until you add an identity provider. Copy the ISO where qemu can read it:
sudo cp ~/ocp4-install/agent.x86_64.iso /var/lib/libvirt/images/Create the cluster VMs
Attach the ISO as a regular CD-ROM disk and use --import. Don’t pass --cdrom. With --cdrom --noautoconsole, virt-install starts the install-phase VM with on_reboot=destroy and exits, so nothing restarts it when the guest reboots. Every node reboots once after writing RHCOS to disk, so the cluster stalls with hosts waiting for user action. We hit exactly that on the first pass (the error is at the end). The function below is the variant that fixed it:
create_node() {
  local name=$1 mac=$2 vcpus=$3 ram=$4 iso=$5
  sudo virt-install --name "$name" \
    --vcpus "$vcpus" --memory "$ram" --cpu host-passthrough \
    --osinfo rhel9.8 \
    --disk size=120,bus=virtio,cache=none,io=native,boot.order=1 \
    --disk path="$iso",device=cdrom,readonly=on,boot.order=2 \
    --network network=ocp4,mac="$mac" \
    --graphics vnc --import --noautoconsole
}
The disk boots first. It is empty on the first start, so the firmware falls through to the ISO. After RHCOS lands on /dev/vda, every later boot comes from disk. The rhel9.8 OS variant matches the RHCOS build inside the ISO, which file reports as rhcos-9.8. Create the four nodes:
ISO=/var/lib/libvirt/images/agent.x86_64.iso
create_node master01 52:54:00:4f:00:11 6 20480 "$ISO"
create_node master02 52:54:00:4f:00:12 6 20480 "$ISO"
create_node master03 52:54:00:4f:00:13 6 20480 "$ISO"
create_node worker01 52:54:00:4f:00:21 4 16384 "$ISO"
Confirm the reboot behaviour on any of them:
sudo virsh dumpxml master01 | grep on_rebootIt must print restart, not destroy. The full check with its output is in the worker02 section below, on the node we built with this function.
The fixed DHCP leases show up within a minute of the VMs booting the ISO:
sudo virsh net-dhcp-leases ocp4Each MAC got the address from the network definition:
 Expiry Time           MAC address         Protocol   IP address          Hostname   Client ID or DUID
-----------------------------------------------------------------------------------------------------------
 2026-10-03 05:52:40   52:54:00:4f:00:11   ipv4       192.168.100.11/24   master01   01:52:54:00:4f:00:11
 2026-10-03 05:52:42   52:54:00:4f:00:12   ipv4       192.168.100.12/24   master02   01:52:54:00:4f:00:12
 2026-10-03 05:52:44   52:54:00:4f:00:13   ipv4       192.168.100.13/24   master03   01:52:54:00:4f:00:13
 2026-10-03 05:52:47   52:54:00:4f:00:21   ipv4       192.168.100.21/24   worker01   01:52:54:00:4f:00:21
Watch the installation
The installer talks to the assisted service on the rendezvous host and streams its progress. Run the bootstrap wait first:
cd ~/ocp4-install
openshift-install agent wait-for bootstrap-complete --dir . --log-level=info
The hosts first validate each other. Ours all failed NTP for about a minute, then passed on their own, and the install started:
level=warning msg=Host master01 validation: Host couldn't synchronize with any NTP server
level=info msg=Host master01 validation: Host NTP is synced
level=info msg=Cluster is ready for install
level=info msg=Cluster validation: All hosts in the cluster are ready to install.
level=info msg=Preparing cluster for installation
The non-rendezvous nodes write RHCOS to disk and reboot. The rendezvous host runs the bootstrap control plane and reboots last. The bootstrap wait gives up after 60 minutes. Ours did exactly that (bootstrap process timed out: context deadline exceeded) while the hosts were still progressing, so the timeout alone does not mean failure. Whether it exits cleanly or times out, move on to the install wait, which picks up wherever the cluster is:
openshift-install agent wait-for install-complete --dir . --log-level=infoIt ends with the console URL and the kubeadmin login:
level=info msg=Bootstrap is complete
level=info msg=cluster bootstrap is complete
level=info msg=Waiting up to 40m0s (until 6:35AM UTC) for the cluster at https://api.ocp4.example.com:6443 to initialize...
level=info msg=Waiting up to 30m0s (until 6:37AM UTC) to ensure each cluster operator has finished progressing...
level=info msg=All cluster operators have completed progressing
level=info msg=Checking to see if there is a route at openshift-console/console...
level=info msg=Install complete!
level=info msg=To access the cluster as the system:admin user when using 'oc', run
level=info msg=    export KUBECONFIG=/home/josphat/ocp4-install/auth/kubeconfig
level=info msg=Access the OpenShift web-console here: https://console-openshift-console.apps.ocp4.example.com
level=info msg=Login to the console with user: "kubeadmin", and password: "REDACTED"
From creating the VMs to Install complete took about 75 minutes on this overcommitted host. Part of that went to the power-off problem from the first pass, so a clean run on a host with real cores should be quicker.
Verify the cluster
Point oc at the generated kubeconfig and list the nodes:
export KUBECONFIG=~/ocp4-install/auth/kubeconfig
oc get nodes -o wide
All four nodes are Ready, each on its fixed DHCP address:
NAME       STATUS   ROLES                         AGE   VERSION   INTERNAL-IP      EXTERNAL-IP   OS-IMAGE                                                KERNEL-VERSION                 CONTAINER-RUNTIME
master01   Ready    control-plane,master,worker   28m   v1.35.6   192.168.100.11   <none>        Red Hat Enterprise Linux CoreOS 9.8.20260915-0 (Plow)   5.14.0-687.48.1.el9_8.x86_64   cri-o://1.35.8-11.rhaos4.22.giteaf45bc.el9
master02   Ready    control-plane,master,worker   44m   v1.35.6   192.168.100.12   <none>        Red Hat Enterprise Linux CoreOS 9.8.20260915-0 (Plow)   5.14.0-687.48.1.el9_8.x86_64   cri-o://1.35.8-11.rhaos4.22.giteaf45bc.el9
master03   Ready    control-plane,master,worker   44m   v1.35.6   192.168.100.13   <none>        Red Hat Enterprise Linux CoreOS 9.8.20260915-0 (Plow)   5.14.0-687.48.1.el9_8.x86_64   cri-o://1.35.8-11.rhaos4.22.giteaf45bc.el9
worker01   Ready    worker                        28m   v1.35.6   192.168.100.21   <none>        Red Hat Enterprise Linux CoreOS 9.8.20260915-0 (Plow)   5.14.0-687.48.1.el9_8.x86_64   cri-o://1.35.8-11.rhaos4.22.giteaf45bc.el9
The control plane nodes also carry the worker role. Red Hat treats three masters with zero or one worker as a compact cluster, and the installer makes the masters schedulable so workloads and the two router replicas have room. A later section undoes that once a second worker joins. Check the cluster version and operators:
oc get clusterversion
oc get co
Every operator reports Available and nothing is Degraded:
NAME      VERSION   AVAILABLE   PROGRESSING   SINCE   STATUS
version   4.22.15   True        False         18m     Cluster version is 4.22.15
NAME                                       VERSION   AVAILABLE   PROGRESSING   DEGRADED   SINCE   MESSAGE
authentication                             4.22.15   True        False         False      19m
baremetal                                  4.22.15   True        False         False      41m
cloud-controller-manager                   4.22.15   True        False         False      44m
cloud-credential                           4.22.15   True        False         False      85m
cluster-autoscaler                         4.22.15   True        False         False      42m
config-operator                            4.22.15   True        False         False      42m
console                                    4.22.15   True        False         False      25m
control-plane-machine-set                  4.22.15   True        False         False      41m
csi-snapshot-controller                    4.22.15   True        False         False      41m
dns                                        4.22.15   True        False         False      41m
etcd                                       4.22.15   True        False         False      39m
image-registry                             4.22.15   True        False         False      30m
ingress                                    4.22.15   True        False         False      30m
insights                                   4.22.15   True        False         False      42m
kube-apiserver                             4.22.15   True        False         False      36m
kube-controller-manager                    4.22.15   True        False         False      36m
kube-scheduler                             4.22.15   True        False         False      39m
kube-storage-version-migrator              4.22.15   True        False         False      42m
machine-api                                4.22.15   True        False         False      38m
machine-approver                           4.22.15   True        False         False      41m
machine-config                             4.22.15   True        False         False      41m
marketplace                                4.22.15   True        False         False      41m
monitoring                                 4.22.15   True        False         False      23m
network                                    4.22.15   True        False         False      42m
node-tuning                                4.22.15   True        False         False      27m
olm                                        4.22.15   True        False         False      41m
openshift-apiserver                        4.22.15   True        False         False      29m
openshift-controller-manager               4.22.15   True        False         False      30m
openshift-samples                          4.22.15   True        False         False      30m
operator-lifecycle-manager                 4.22.15   True        False         False      41m
operator-lifecycle-manager-catalog         4.22.15   True        False         False      42m
operator-lifecycle-manager-packageserver   4.22.15   True        False         False      31m
service-ca                                 4.22.15   True        False         False      42m
storage                                    4.22.15   True        False         False      41m
The core user on every node takes the SSH key from the install config, which is how you get onto a node when the API is down:
ssh [email protected] cat /etc/redhat-releaseRHCOS reports its RHEL base:
Red Hat Enterprise Linux release 9.8 (Plow)Open the web console from your workstation
The console lives on a private network inside the host, so your laptop can’t resolve or reach it. A SOCKS tunnel fixes both at once, because the browser hands DNS lookups to the far end where the host resolver knows the cluster domain. From your workstation:
ssh -N -D 1080 josphat@kvm01Leave that running and start a browser that uses the tunnel. Chrome and Chromium send DNS through a SOCKS5 proxy by default. The separate --user-data-dir matters, because Chrome ignores --proxy-server when another Chrome window is already open:
google-chrome --user-data-dir=/tmp/ocp-chrome --proxy-server="socks5://127.0.0.1:1080" https://console-openshift-console.apps.ocp4.example.comIn Firefox, set a manual SOCKS v5 proxy on 127.0.0.1:1080 and tick “Proxy DNS when using SOCKS v5”. Accept the self-signed certificate warnings for the console and the OAuth server, then log in as kubeadmin with the password from ~/ocp4-install/auth/kubeadmin-password.

The Overview page confirms the BareMetal infrastructure provider and a healthy control plane. The one warning, AlertmanagerReceiversNotConfigured, only means nobody gets alert notifications yet:

Compute, then Nodes, lists all five machines with their real memory and CPU use. Only worker01 belongs to a MachineSet. The day-2 worker we add next shows up with none, which is expected for nodes added from an ISO:

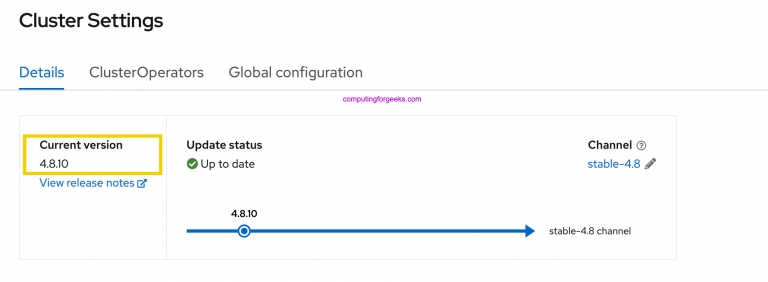
Administration, then Cluster Settings, shows the installed release, its update channel and the 60-day self-support trial counter:

Add a worker node after install
Adding a node after day one needs no access to the original install directory. oc adm node-image create reads the configuration stored in the cluster and builds a node ISO for the MAC you give it. It needs rsync on the host and the pull secret:
sudo dnf -y install rsync
mkdir -p ~/add-worker02 && cd ~/add-worker02
oc adm node-image create --mac-address=52:54:00:4f:00:22 --hostname=worker02 --root-device-hint=deviceName:/dev/vda -a ~/.openshift/pull-secret
It took 1 minute 50 seconds and wrote node.x86_64.iso:
2026-10-03T06:26:19Z [node-image create] Launching command
2026-10-03T06:27:20Z [node-image create] Gathering additional information from the target cluster
2026-10-03T06:27:20Z [node-image create] Creating internal configuration manifests
2026-10-03T06:27:20Z [node-image create] Rendering ISO ignition
2026-10-03T06:27:20Z [node-image create] Retrieving the base ISO image
2026-10-03T06:27:20Z [node-image create]   Extracting base image from release payload
2026-10-03T06:27:45Z [node-image create]   Verifying base image version
2026-10-03T06:27:55Z [node-image create] Creating agent artifacts for the final image
2026-10-03T06:27:55Z [node-image create]   Extracting required artifacts from release payload
2026-10-03T06:28:05Z [node-image create]   Preparing artifacts
2026-10-03T06:28:05Z [node-image create] Assembling ISO image
2026-10-03T06:28:05Z [node-image create] Saving ISO image to /home/josphat/add-worker02
2026-10-03T06:28:10Z [node-image create] Command successfully completed
The worker02 MAC and IP are already in the network definition, so DHCP and DNS are ready for it. Boot the new VM from the node ISO with the same function:
sudo cp ~/add-worker02/node.x86_64.iso /var/lib/libvirt/images/
create_node worker02 52:54:00:4f:00:22 4 16384 /var/lib/libvirt/images/node.x86_64.iso
Check its reboot setting before it gets that far:
sudo virsh dumpxml worker02 | grep -E "on_reboot|boot order"The disk carries boot order 1, the CD-ROM order 2, and a guest reboot restarts the VM. Our first four nodes used --cdrom, and the one still in its install phase showed destroy here, which is the error covered at the end:
  <on_reboot>restart</on_reboot>
      <boot order='1'/>
      <boot order='2'/>
Then follow it from the cluster side:
oc adm node-image monitor --ip-addresses 192.168.100.22 -a ~/.openshift/pull-secretThe monitor walks through validation, the disk write and one reboot. Then it stops at two certificate signing requests that need a human:
2026-10-03T06:31:08Z [node-image monitor] Node 192.168.100.22: Host worker02: updated status from known to installing (Installation is in progress)
2026-10-03T06:32:23Z [node-image monitor] Node 192.168.100.22: Host: worker02, reached installation stage Writing image to disk: 100%
2026-10-03T06:32:28Z [node-image monitor] Node 192.168.100.22: Host: worker02, reached installation stage Rebooting
2026-10-03T06:35:21Z [node-image monitor] Node 192.168.100.22: First CSR Pending approval
2026-10-03T06:35:21Z [node-image monitor] Node 192.168.100.22: CSR csr-7q75r with signerName kubernetes.io/kube-apiserver-client-kubelet and username system:serviceaccount:openshift-machine-config-operator:node-bootstrapper is Pending and awaiting approval
Approve every pending CSR. Run it once for the client CSR, then again a few minutes later when the kubelet serving CSR appears:
oc get csr -o go-template='{{range .items}}{{if not .status}}{{.metadata.name}}{{"\n"}}{{end}}{{end}}' | xargs --no-run-if-empty oc adm certificate approveThe first run approved the client CSR:
certificatesigningrequest.certificates.k8s.io/csr-7q75r approvedAfter the second approval the monitor exits. The whole join took about 10 minutes. List the nodes:
oc get nodesworker02 is Ready alongside the original four:
NAME       STATUS   ROLES                         AGE     VERSION
master01   Ready    control-plane,master,worker   46m     v1.35.6
master02   Ready    control-plane,master,worker   62m     v1.35.6
master03   Ready    control-plane,master,worker   62m     v1.35.6
worker01   Ready    worker                        46m     v1.35.6
worker02   Ready    worker                        6m26s   v1.35.6
Move workloads off the control plane
With two workers, the masters no longer need to run application pods. Flip the scheduler setting:
oc patch schedulers.config.openshift.io cluster --type merge -p '{"spec":{"mastersSchedulable":false}}'Give it a few seconds and list the nodes again:
oc get nodesThe worker role is gone from the masters:
NAME       STATUS   ROLES                  AGE     VERSION
master01   Ready    control-plane,master   47m     v1.35.6
master02   Ready    control-plane,master   63m     v1.35.6
master03   Ready    control-plane,master   63m     v1.35.6
worker01   Ready    worker                 47m     v1.35.6
worker02   Ready    worker                 6m57s   v1.35.6
Pods already on the masters stay where they are. That matters most for the routers, because the ingress VIP follows the router pods. Ours still sat on master02 and master03. Restart the router deployment so the scheduler places them on workers:
oc rollout restart deployment/router-default -n openshift-ingress
oc rollout status deployment/router-default -n openshift-ingress --timeout=300s
oc get pods -n openshift-ingress -o wide
Both new router pods landed on the workers:
NAME                              READY   STATUS        RESTARTS      AGE   IP               NODE       NOMINATED NODE   READINESS GATES
router-default-6dc5cfbf65-qgs8l   0/1     Terminating   4 (51m ago)   62m   192.168.100.13   master03   <none>           <none>
router-default-99d9f7d6d-bh8v7    1/1     Running       0             35s   192.168.100.21   worker01   <none>           <none>
router-default-99d9f7d6d-vjh82    1/1     Running       0             70s   192.168.100.22   worker02   <none>           <none>
Thirty seconds later, keepalived had moved 192.168.100.7 to worker02, and both the console and a test route still answered HTTP 200 through the VIP.
Give the image registry NFS storage
On bare metal the internal image registry installs in the Removed state, because there is no default storage class. Builds need it. The KVM host is already on the cluster network at 192.168.100.1, so it can serve NFS. Our NFS server guide for Rocky and AlmaLinux covers the server side in depth. The short version for this lab:
sudo dnf -y install nfs-utils
sudo mkdir -p /srv/nfs/ocp-registry
sudo chown root:root /srv/nfs/ocp-registry
sudo chmod 0770 /srv/nfs/ocp-registry
echo "/srv/nfs/ocp-registry 192.168.100.0/24(rw,sync,no_subtree_check,no_root_squash)" | sudo tee /etc/exports.d/ocp-registry.exports
sudo systemctl enable --now nfs-server
The ownership is not arbitrary. The registry pod runs as a random UID with group 0, so the directory must be writable by the root group. We first used nobody:nobody, and every push failed with a 500 error (see the end of the guide).
If firewalld runs on the host, the libvirt bridge sits in the libvirt zone. That zone only allows DHCP, DNS, SSH and TFTP from guests. Our test from master01 was refused until NFS was added:
sudo firewall-cmd --zone=libvirt --add-service={nfs,rpc-bind,mountd} --permanent
sudo firewall-cmd --reload
sudo firewall-cmd --zone=libvirt --list-services
NFS now shows in the zone:
dhcp dhcpv6 dns mountd nfs rpc-bind ssh tftpCreate a PersistentVolume that points at the export:
vim ~/registry-pv.yamlPaste the volume definition:
apiVersion: v1
kind: PersistentVolume
metadata:
  name: image-registry-pv
spec:
  capacity:
    storage: 100Gi
  accessModes:
  - ReadWriteMany
  persistentVolumeReclaimPolicy: Retain
  nfs:
    server: 192.168.100.1
    path: /srv/nfs/ocp-registry
Apply it, then set the registry to Managed with two replicas. An empty claim tells the operator to create its own PVC named image-registry-storage, which binds to the PV above:
oc apply -f ~/registry-pv.yaml
oc patch configs.imageregistry.operator.openshift.io cluster --type merge -p '{"spec":{"managementState":"Managed","replicas":2,"storage":{"pvc":{"claim":""}}}}'
Give the operator a minute, then check the claim and the registry pods:
oc get pvc -n openshift-image-registry
oc get pods -n openshift-image-registry -l docker-registry=default -o wide
The claim is bound and both registry pods are running:
NAME                     STATUS   VOLUME              CAPACITY   ACCESS MODES   STORAGECLASS   VOLUMEATTRIBUTESCLASS   AGE
image-registry-storage   Bound    image-registry-pv   100Gi      RWX                           <unset>                 60s
NAME                              READY   STATUS    RESTARTS   AGE   IP             NODE       NOMINATED NODE   READINESS GATES
image-registry-5bf9d78cff-674h5   1/1     Running   0          59s   10.128.0.100   master02   <none>           <none>
image-registry-5bf9d78cff-fkk94   1/1     Running   0          59s   10.129.0.105   master03   <none>           <none>
Build and expose a test app
A source-to-image build exercises the whole stack at once: a Git clone from the internet, a build pod, a push to the internal registry on NFS, a deployment and a route through the ingress VIP:
oc new-project demo
oc new-app httpd~https://github.com/sclorg/httpd-ex.git --name=web
oc expose service/web
Once the build completes, the deployment rolls out on a worker:
oc get build -n demo
oc get pods -n demo -o wide
Build web-3 is the one that ran after the registry permission fix:
NAME    TYPE     FROM          STATUS                               STARTED          DURATION
web-1   Source   Git@658aff0   Failed (PushImageToRegistryFailed)   12 minutes ago   37s
web-2   Source   Git@658aff0   Failed (GenericBuildFailed)          6 minutes ago    20s
web-3   Source   Git@658aff0   Complete                             14 seconds ago   14s
NAME                   READY   STATUS      RESTARTS   AGE     IP            NODE       NOMINATED NODE   READINESS GATES
web-3-build            0/1     Completed   0          17s     10.130.0.15   worker01   <none>           <none>
web-7d9967f78c-q6gzs   1/1     Running     0          5s      10.128.2.8    worker02   <none>           <none>
The route is reachable from the host:
export CLUSTER_DOMAIN="ocp4.example.com"
curl -s http://web-demo.apps.${CLUSTER_DOMAIN}/ | grep -o "<title>[^<]*"
That title comes from the sample app itself:
<title>Welcome to OpenShiftThe Topology view in the console shows the same deployment, with the route link on the top right of the node:

For a lighter OpenShift on a laptop, OpenShift Local (CRC) runs a single node with far less RAM. The community build of this same stack is covered in our OKD on Fedora CoreOS guide. To reach the internal registry from outside the cluster, expose it with a route.
Errors we hit and how we fixed them
Every error below came from this lab run. None were staged.
“Host timed out when pulling the configuration files”
master02 and master03 wrote RHCOS to disk, rebooted, and the installer then reported:
level=warning msg=Host master02: updated status from installing-in-progress to installing-pending-user-action (Host timed out when pulling the configuration files. Verify in the host console that the host boots from the OpenShift installation disk (vda, /dev/disk/by-path/pci-0000:04:00.0) and has network access to the cluster API. The installation will resume after the host successfully boots and can access the cluster API)
level=info msg=cluster has stopped installing... working to recover installation
The VMs were not booting the wrong disk. They were off. We had created them with virt-install --cdrom, which starts the install-phase VM with on_reboot=destroy. virsh dumpxml showed it on the node that had not rebooted yet:
<on_reboot>destroy</on_reboot>Starting the stopped VMs with sudo virsh start master02 let the install recover by itself. The rendezvous host and the worker then needed the same nudge when they rebooted. The permanent fix is the --import plus CD-ROM disk form used in this guide, which sets on_reboot=restart from the start. worker02 was created that way and came back from its reboot without help.
“Host couldn’t synchronize with any NTP server”
All four hosts reported this right after booting the ISO, and every host also flagged “No connectivity to the majority of hosts in the cluster”. Both cleared within about a minute once the nodes found each other and chronyd synced. If it persists, the nodes cannot reach UDP 123 on the internet. Point them at an internal server with additionalNTPSources in agent-config.yaml, or after install with a chrony MachineConfig.
“received unexpected HTTP status: 500 Internal Server Error” on build push
The first S2I build failed at the push step:
error: build error: Failed to push image: trying to reuse blob sha256:1587de7096c53a0b9fd09d99828507d9d9217e2b7edf597bc375022a17d2b1b9 at destination: checking whether a blob sha256:1587de7096c53a0b9fd09d99828507d9d9217e2b7edf597bc375022a17d2b1b9 exists in image-registry.openshift-image-registry.svc:5000/demo/web: received unexpected HTTP status: 500 Internal Server ErrorThe registry log had the real cause, permission denied on the NFS path:
oc logs -n openshift-image-registry deploy/image-registry | grep -i deniedOne of the matching lines, trimmed to the error detail:
err.detail="filesystem: stat /registry/docker/registry/v2/blobs/sha256/22/224633db4e3d3cb4ff79a3a57fa245728ba7db41f2fc2e8c9cf051adc6e13e15/data: permission denied"The registry process runs as uid=1000320000 gid=0(root), and the export directory was nobody:nobody with mode 0770, so the pod could not even list it. Changing the owner to root:root with 0770 fixed it without opening the share to everyone. A build that started in the same minute as the change still failed with the same error on a pull, so retry the build after fixing the permissions.
No route to host after restarting the libvirt network
Restarting the network with virsh net-destroy ocp4 and net-start (to put it into the firewalld zone, for example) detaches the tap device of every running VM from the bridge. The nodes keep running but drop off the network:
ssh: connect to host 192.168.100.11 port 22: No route to hostReattach each VM interface to the bridge, or restart the VMs. In our run the first ssh after the reattach still failed; it worked after the next firewall-cmd --reload a few seconds later, so give it a moment (and reload firewalld if it runs) before you conclude the reattach did not work:
for d in master01 master02 master03 worker01 worker02; do
  for v in $(sudo virsh domiflist "$d" | awk '/ocp4/{print $1}'); do
    sudo ip link set "$v" master virbr-ocp4
  done
done
Our cluster went back to all nodes Ready and the test route answered again. The cleaner habit is to make firewalld and NFS changes before you create the VMs, so the network never needs a restart while the cluster is running.





First of all, I’m new to this openshift environment but this document has given me a clear picture of ocp4 installaion. Thank you so much for sharing this document and it helps me a lot 🙂
Thanks for the positive comment.
thanks for the detailed installation setup.
Web console is not accessible for me
Hi Josphat,
first thank you for the tutorial learn alot. Iam actually having issue with dns, after I run ansible, I stoped in this bug as below:
[root@fedora ocp4_ansible]# nmcli connection up enp1s0
Error: Connection activation failed: IP configuration could not be reserved (no available address, timeout, etc.)
Hint: use ‘journalctl -xe NM_CONNECTION=3771b159-c3a1-4e68-9b93-ea8150ee0ec5 + NM_DEVICE=enp1s0’ to get more details.
is there any step I need to do on the bastion server or on my main fedora server?
I apreaiate your support on this.
Hi,
This seems to be an issue with your DHCP server assigning addresses. Please validate configs on DHCP server – address pool and if working.
iam using the same subnet like yours.
so Iam really not sure how to get it work, really trying for 4 days with this issue. I appreciate your support Josphat.
————————————————
[root@fedora etc]# systemctl status named
● named.service – Berkeley Internet Name Domain (DNS)
Loaded: loaded (/usr/lib/systemd/system/named.service; enabled; vendor pre>
Active: active (running) since Fri 2021-12-24 22:20:30 EST; 9h ago
Process: 2903 ExecStartPre=/bin/bash -c if [ ! “$DISABLE_ZONE_CHECKING” == >
Process: 2905 ExecStart=/usr/sbin/named -u named -c ${NAMEDCONF} $OPTIONS (>
Main PID: 2906 (named)
Tasks: 8 (limit: 4668)
Memory: 24.6M
CPU: 163ms
CGroup: /system.slice/named.service
└─2906 /usr/sbin/named -u named -c /etc/named.conf
Dec 24 22:20:30 fedora named[2906]: zone ocp4.example.com/IN: loaded serial 202>
Dec 24 22:20:30 fedora named[2906]: zone localhost.localdomain/IN: loaded seria>
Dec 24 22:20:30 fedora named[2906]: all zones loaded
Dec 24 22:20:30 fedora systemd[1]: Started Berkeley Internet Name Domain (DNS).
Dec 24 22:20:30 fedora named[2906]: running
Dec 24 22:20:30 fedora named[2906]: managed-keys-zone: Key 20326 for zone . is >
Dec 24 22:31:38 fedora named[2906]: no longer listening on 192.168.100.254#53
Dec 24 22:32:24 fedora named[2906]: listening on IPv4 interface enp1s0, 192.168>
Dec 24 22:35:46 fedora named[2906]: no longer listening on 192.168.100.254#53
Dec 24 22:36:32 fedora named[2906]: listening on IPv4 interface enp1s0, 192.168
——————————–
[root@fedora dhcp]# cat dhcpd.conf
authoritative;
ddns-update-style interim;
default-lease-time 14400;
max-lease-time 14400;
allow booting;
allow bootp;
option routers 192.168.100.1;
option broadcast-address 192.168.100.255;
option subnet-mask 255.255.255.0;
option domain-name-servers 192.168.100.254;
option ntp-servers time.google.com;
option domain-name “ocp4.example.com”;
option domain-search “ocp4.example.com”, “example.com”;
subnet 192.168.100.0 netmask 255.255.255.0 {
interface enp1s0;
pool {
range 192.168.100.10 192.168.100.50;
# Static entries
host bootstrap { hardware ethernet 52:54:00:a4:db:5f; fixed-address 192.168.100.10; }
host master01 { hardware ethernet 52:54:00:8b:a1:17; fixed-address 192.168.100.11; }
host master02 { hardware ethernet 52:54:00:ea:8b:9d; fixed-address 192.168.100.12; }
host master03 { hardware ethernet 52:54:00:f8:87:c7; fixed-address 192.168.100.13; }
host worker01 { hardware ethernet 52:54:00:31:4a:39; fixed-address 192.168.100.21; }
host worker02 { hardware ethernet 52:54:00:6a:37:32; fixed-address 192.168.100.22; }
host worker03 { hardware ethernet 52:54:00:95:d4:ed; fixed-address 192.168.100.23; }
# this will not give out addresses to hosts not listed above
deny unknown-clients;
# this is PXE specific
filename “pxelinux.0”;
next-server 192.168.100.254;
}
}
I have problem with bastion/helper MAC addresse,
[root@fedora ocp4_ansible]# systemctl status dhcpd
● dhcpd.service – DHCPv4 Server Daemon
Loaded: loaded (/usr/lib/systemd/system/dhcpd.service; enabled; vendor pre>
Active: active (running) since Sat 2021-12-25 08:56:12 EST; 3min 37s ago
Docs: man:dhcpd(8)
man:dhcpd.conf(5)
Main PID: 4423 (dhcpd)
Status: “Dispatching packets…”
Tasks: 1 (limit: 4668)
Memory: 9.7M
CPU: 9ms
CGroup: /system.slice/dhcpd.service
└─4423 /usr/sbin/dhcpd -f -cf /etc/dhcp/dhcpd.conf -user dhcpd -gr>
Dec 25 08:56:12 fedora dhcpd[4423]: Listening on LPF/enp1s0/52:54:00:bd:0e:99/1>
Dec 25 08:56:12 fedora dhcpd[4423]: Sending on LPF/enp1s0/52:54:00:bd:0e:99/1>
Dec 25 08:56:12 fedora dhcpd[4423]: Sending on Socket/fallback/fallback-net
Dec 25 08:56:12 fedora dhcpd[4423]: Server starting service.
Dec 25 08:56:12 fedora systemd[1]: Started DHCPv4 Server Daemon.
Dec 25 08:58:48 fedora dhcpd[4423]: DHCPDISCOVER from 52:54:00:bd:0e:99 via enp>
Dec 25 08:58:50 fedora dhcpd[4423]: DHCPDISCOVER from 52:54:00:bd:0e:99 via enp>
Dec 25 08:58:55 fedora dhcpd[4423]: DHCPDISCOVER from 52:54:00:bd:0e:99 via enp>
Dec 25 08:59:03 fedora dhcpd[4423]: DHCPDISCOVER from 52:54:00:bd:0e:99 via enp>
Dec 25 08:59:20 fedora dhcpd[4423]: DHCPDISCOVER from 52:54:00:bd:0e:99 via enp>
you know what I will do it manually trhough the UI Virt-manager, but I like the way you did it through the cli but not save 🙂
yes it worked, with virt-manager excellent through the UI and managing the images. Thank you alot for this amazing deep dive into openshift preparing the prerequisites.
I don’t see a response from writer on how you fixed this. I am having same issue.
After installing openshift 4.9 with your howto I cannot reach the webconsole. When checking the logs for the console pod:
0128 13:24:18.253509 1 auth.go:231] error contacting auth provider (retrying in 10s): request to OAuth issuer endpoint https://oauth-openshift.apps.ocp4.lagrange.com/oauth/token failed: Head “https://oauth-openshift.apps.ocp4.lagrange.com”: EOF
E0128 13:24:28.293887 1 auth.go:231] error contacting auth provider (retrying in 10s): request to OAuth issuer endpoint https://oauth-openshift.apps.ocp4.lagrange.com/oauth/token failed: Head “https://oauth-openshift.apps.ocp4.lagrange.com”: EOF
What is wrong?
I’m running into an error with the workers and masters timing out trying to get to the ignition scripts; there’s a timeout trying to reach https://api-int, which is listening. I created a self-signed cert and added that to the haproxy config, but am still seeing the tcp dial io timeout.
Any ideas?
I’d submitted a comment about having a timeout / possible ssl issue, but that was entirely my networking. Working now. This is an awesome step-by-step, and it has given me a lot of valuable stick time on this openshift nonsense. I genuinely appreciate what you’ve done here. Thanks very much!
Thank you Jason.
Hi Jason,
Can you please let me know ,how your issue resolved.I have faced the same timeout issue in my environment.
[root@api ~]# oc get co authentication
NAME VERSION AVAILABLE PROGRESSING DEGRADED SINCE MESSAGE
authentication 4.9.19 False False True 7m7s OAuthServerRouteEndpointAccessibleControllerAvailable: route.route.openshift.io “oauth-openshift” not found
OAuthServerServiceEndpointAccessibleControllerAvailable: Get “https://172.30.21.224:443/healthz”: context deadline exceeded (Client.Timeout exceeded while awaiting headers)
OAuthServerServiceEndpointsEndpointAccessibleControllerAvailable: endpoints “oauth-openshift” not found
ReadyIngressNodesAvailable: Authentication requires functional ingress which requires at least one schedulable and ready node. Got 0 worker nodes, 1 master nodes, 0 custom target nodes (none are schedulable or ready for ingress pods).
WellKnownAvailable: The well-known endpoint is not yet available: failed to get oauth metadata from openshift-config-managed/oauth-openshift ConfigMap: configmap “oauth-openshift” not found (check authentication operator, it is supposed to create this)
any idea?
Do you have an active worker node in your cluster?
Hi, Josphat,
Thank you for your very useful blog.
In section: Download Pull Secret
You mention:
Visit cloud.redhat.com and select “Bare Metal” then “UPI“.
I have not idea how to get those secret from this description. There si no “Bare Metal” in the page of cloud.redhat.com.
Could you help on that?
Thanks
H Ken. Use the link https://console.redhat.com/openshift/install/pull-secret
Hi Josphat,
I’ve followed your guide to the letter. It’s been incredibly educational and I learned a lot on how OCP operates. What I’m completely stuck on is accessing the Openshift console. Is there a particular forwarding piece I’m missing here? How is everyone else doing it?
I’ve been running this on KVM on RHEL8.x. How can I access the openshift console externally?
Thanks
We’re delighted at least you got the setup up and running. Access to console is through HAProxy LB and mapped DNS name.
You can get console address by running the commands:
If your DNS is working ok you should be able to access OpenShift Console.
I’m still a bit lost here. If I’m logged into the bastion vm, all this works fine. OC commands work, etc. I can even login to the cluster from the KVM host itself. What I can’t seem to understand is how to get to the openshift console from outside the KVM host. The KVM host lives in a datacenter and is just running RHEL 8 server with no desktop. HAProxy works fine on the KVM host as it can get to all the services on the cluster running internally.
DNS is working inside the cluster. The nodes can all resolve each other no problem. But the ip range is private inside.
I feel like I’m missing a step here. I reviewed and followed your directions above multiple times, but sitting here at my laptop, I cannot open the console. Does the DNS need to be resolvable outside the KVM host as well? Are there ports that need to be forwarded on the KVM host?
I had the same issue. It is possible the tutorial assumes the hypervisor host has a gui and just dropped to the terminal?
In any case, I spun up a VM with a GUI with both openshift and default networks and am finally at the web console.
Hi Jospat, Amazing work. Works like a charm. I knew Kuberenetes and all but OCP installation I could not find a clear instructoin on how to install. Your guide was the guiding light for me. Thanks a Ton. I would like to buy you 10 coffees. Please DM me.
The TFTP files have changed to the below names, the wget doesn’t work anymore. Great blog though Josphat:
rhcos-live-initramfs.x86_64.img
rhcos-live-kernel-x86_64
rhcos-live-rootfs.x86_64.img
The files are available here: https://console.redhat.com/openshift/install/metal/user-provisioned
Thanks for the tip. We’ve updated the guide accordingly.
I installed this, but when I try to validate things, “oc whoami”, I get the following error. DNS seems to be picking it up, but not sure where else to look: (newbie)
oc whoami
Unable to connect to the server: dial tcp: lookup api.ocp4.nsidedabox.local: no such host
[phillip@fedora ~]$ nslookup api.ocp4.nsidedabox.local
Server: 192.168.4.5
Address: 192.168.4.5#53
Name: api.ocp4.nsidedabox.local
Address: 192.168.100.254
While I have deployed well over 100 OCP clusters starting at 4.2 with the latest at 4.11.0 I have a need to build an OCP 4.10 cluster on KVM, and that is a platform Red Hat only has documentation for with LinuxONE. So your guide is very valuable and much appreciated. I though am curious if you have a similar guide using RHEL or CentOS 8 worker nodes, in place of RHCOS? My next demo cluster needs to have RHEL or CentOS worker nodes and I’d like to run on KVM if possible. Thanks
At the moment we don’t have one. We’ll play with it and hopefully write about. Thank you.
My cluster works, however when I try to login using “oc login -u ” I get error: x509: certificate signed by unknown authority all the time.
What can I do to mitigate this?
Which browser?, Did you try Firefox?
Its not in browser its on the command line when I try
oc login -u …….
When I create the Bootstrap Virtual Machine using command below:
sudo virt-install -n bootstrap.ocp4.example.com \
–description “Bootstrap Machine for Openshift 4 Cluster” \
–ram=8192 \
–vcpus=4 \
–os-type=Linux \
–os-variant=rhel8.0 \
–noreboot \
–disk pool=default,bus=virtio,size=50 \
–graphics none \
–serial pty \
–console pty \
–pxe \
–network bridge=openshift4,mac=52:54:00:a4:db:5f
It stucks at below:
[** ] A start job is running for Acquire …ootfs image (51min 53s / no limit)[ 3118.047630] coreos-livepxe-rootfs[865]: curl: (7) Failed to connect to 192.168.100.254 port 8080: Connection timed out
[ 3118.052072] coreos-livepxe-rootfs[805]: Couldn’t establish connectivity with the server specified by:
[ 3118.055647] coreos-livepxe-rootfs[805]: coreos.live.rootfs_url=http://192.168.100.254:8080/rhcos/rootfs.img
[ 3118.059331] coreos-livepxe-rootfs[805]: Retrying in 5s…
[ * coreos-livepxe-rootfs[867]: curl: (7) Failed to connect to 192.168.100.254 port 8080: Connection timed out
Can you shed a light on this?
hi Josphat Mutai
can you advise on my problem when firing up the master node :
GET error : Get “https://api-int.ocp4.example.com:22623/config/master”
I can do telnet to the port successfully from bastion host, so it means ther service is working fine on port 22623….but when i try to access the specific url using curl…..this is the error i got :
OpenSSL SSL_connect: SSL_ERROR_SYSCALL in connection to api-int.ocp4.example.com:22623
curl: (35) OpenSSL SSL_connect: SSL_ERROR_SYSCALL in connection to api-int.ocp4.example.com:22623
please advise.
Arry, can you please tell me how were you able to resolve the issue?
Testtttt !!!!!
I don’t have much resource on my machine, is that possible to install only one master and one worker node, and it will still work?
When I tried creating bootstrap machine in virsh
sudo virt-install -n bootstrap.ocp4.example.com –description “Bootstrap Machine for Openshift 4 Cluster” –ram=4096 –vcpus=4 –os-type=Linux –os-variant=rhel8.4 –noreboot –disk pool=default,bus=virtio,size=50 –graphics none –serial pty –console pty –pxe –network bridge=openshift4,mac=52:54:00:a4:db:5f
The issue I got is,
[FAILED] Failed to start Rebuild Journal Catalog.
See ‘systemctl status systemd-journal-catalog-update.service’ for details.
:
:
:
[ OK ] Stopped Update is Completed.
[ OK ] Stopped Rebuild Hardware Database.
[ OK ] Stopped Rebuild Dynamic Linker Cache.
[ OK ] Stopped CoreOS: Set printk To Level 4 (warn).
[ OK ] Stopped target Local Encrypted Volumes.
[ OK ] Stopped target Local Encrypted Volumes (Pre).
[ OK ] Stopped Dispatch Password Requests to Console Directory Watch.
[ OK ] Stopped Load Kernel Modules.
[ OK ] Stopped Load/Save Random Seed.
[ OK ] Stopped Update UTMP about System Boot/Shutdown.
Unmounting var.mount…
[ OK ] Stopped Create Volatile Files and Directories.
[ OK ] Stopped target Local File Systems.
Unmounting Temporary Directory (/tmp)…
Unmounting /run/ephemeral…
Unmounting /etc…
[FAILED] Failed unmounting var.mount.
[FAILED] Failed unmounting /etc.
[ OK ] Unmounted Temporary Directory (/tmp).
[ OK ] Stopped target Swap.
[ OK ] Unmounted /run/ephemeral.
[ OK ] Reached target Unmount All Filesystems.
[ OK ] Stopped target Local File Systems (Pre).
[ OK ] Stopped Create Static Device Nodes in /dev.
[ OK ] Stopped Create System Users.
Stopping Monitoring of LVM2 mirrors…ng dmeventd or progress polling…
[ OK ] Stopped Monitoring of LVM2 mirrors,…sing dmeventd or progress polling.
[ OK ] Reached target Shutdown.
[ OK ] Reached target Final Step.
[ OK ] Started Reboot.
[ OK ] Reached target Reboot.
[ 68.354526] watchdog: watchdog0: watchdog did not stop!
[ 68.458591] reboot: Restarting system
Why I’m getting this error
[FAILED] Failed to start Rebuild Journal Catalog.
[FAILED] Failed unmounting var.mount.
[FAILED] Failed unmounting /etc.
Same here, and it then prevents the automation of the whole cluster. I should mention that I use a nested virtualization.
Hello Josphat,
thanks for the step by step installation guide which is well defined !
Could you please tell me that in order to add additional worker after cluster initiated which steps I need to use ? Is there anyway to use existing yaml files to add worker to existing cluster ?
Thank you,
Leo
Similar steps in bootstrapping the initial nodes as covered in the article.
Josphat,
Great article. I have been trying for 2 months to do this. It’s fairly complex. I now have a running cluster and i’m starting to play with it. I used fedora38 without any problems. I used Network Manager so I had to change the bastion network setup. Everything else ran pretty much without a hitch. Thank you for doing this.
Brian
Nice happy for you Brian that you did manage to bring up the cluster.
Hi Josphat,
your post was very helpful for us to change our existing ocp installation tool. We used a old “helpernodectl binary” and ocp 4.13 didn’t got installed with this tool.
With you block we were be able to remove the helpernodectl binary tool and implement all steps qith ansibl. We have now one Ansible playbook that runs on KVM and VMware.
I have only one open question to the step with the TFTP service.
Why do we need to create this “start-tftp.sh” script ?
What will be happen if we don’t have this script ?
You may can give us a short explanation !
I can sy create job ! Thank you
start-tftp.sh is not must create.
Current openshift-installer from that wget is 4.13.9 and when i try to create manifest its missing the manifests/04-openshift-machine-config-operator.yaml file. So does procedure still apply to version later than 4.13.4 which is used in above example ? i did continue and built bootstrap without error but it cannot start kubelet.service and ‘get pods’ fails with
“E0821 11:22:35.502291 6321 memcache.go:238] couldn’t get current server API group list: Get “https://api.ocp4.example.com:6443/api?timeout=32s”: EOF
Unable to connect to the server: EOF”
I can see the port 6443 is in LISTEN mode so wondering if something changed? Any help please?
We’ve dated the article against the latest release of OpenShift and it works.
Hi. Excellent insight. Thank you!
Has anyone ever stumbled of the error below ? The bootstrapper seems to be working fine but it seems none of the masters are able to join. The LAB is running on fedora38;poweredge;256GB RAM.
Aug 30 18:30:02 master02.ocp4.example.com kubenswrapper[2338]: E0830 18:30:02.176004 2338 kubelet.go:2495] “Container runtime network not ready” networkReady=”NetworkReady=false reason:NetworkPluginNotReady message:Network plugin returns error: No CNI configuration file in /etc/kubernetes/cni/net.d/. Has your network provider started?”
I have the same issue – I would apperciate help with this one please.
Seem deployment not yet complete. How fast is your internet?, also ssh into one of the control plane node and run
journalctl -fto see what’s happening.have your resolved? i have the same problem..
I think that this error is just a result of some previous errors. The operator controllers are not fully comming up. Internet is fast. So ist the mem/cpu power. Will give it some more shots…
The `openshift-install` is not showing kvm platform, any idea how to choose the platform ?
““
$ openshift-install create ignition-configs
? SSH Public Key /root/.ssh/id_rsa.pub
? Platform [Use arrows to move, type to filter, ? for more help]
gcp
ibmcloud
nutanix
openstack
> ovirt
powervs
vsphere
Thank you for the helpful article. By using it, I was able to successfully stand up an OpenShift 4.17 libvirt VM cluster. However, I had to modify the `virt-install` command for creating the control node/s. The command uses the argument `–ram=8192`. However, this does not match the “preferred” amount of memory (16GB) specified in the beginning of the article.
I was having a problem during the installation where my worker nodes were not coming up. When I checked resources on the control node, output showed that memory use was close to 100% when trying to bring up worker nodes.
“`
oc describe node master01.ocp4.local
“`
“`
Allocated resources:
(Total limits may be over 100 percent, i.e., overcommitted.)
Resource Requests Limits
——– ——– ——
cpu 1306m (37%) 10m (0%)
memory 6537Mi (95%) 0 (0%)
ephemeral-storage 0 (0%) 0 (0%)
hugepages-1Gi 0 (0%) 0 (0%)
hugepages-2Mi 0 (0%) 0 (0%)
“`
When I destroyed and undefined the control node and created it with `–ram=16384`, the three worker nodes successfully came up. Checking the control node’s resources later, more memory than the originally allocated 8GB is needed:
“`
Allocated resources:
(Total limits may be over 100 percent, i.e., overcommitted.)
Resource Requests Limits
——– ——– ——
cpu 2236m (29%) 10m (0%)
memory 9501Mi (63%) 0 (0%)
ephemeral-storage 0 (0%) 0 (0%)
hugepages-1Gi 0 (0%) 0 (0%)
hugepages-2Mi 0 (0%) 0 (0%)
“`
hmm so only with 16GB was the setup successful?
For me, yes.
Why not use agent based installer, generate ISO file and boot VM’s from it? It takes less than 1-2 hours to setup the whole thing.
https://www.redhat.com/en/blog/meet-the-new-agent-based-openshift-installer-1
Valid point, and for this topology the agent-based installer is the faster route: in-place bootstrap on node zero means no dedicated bootstrap VM, and one agent ISO replaces the whole DHCP, TFTP and PXE chain. It does not remove DNS for api and *.apps, or whatever answers the API and ingress VIPs, so on platform none you still stand those up yourself. This guide walks the UPI path on purpose because every piece stays visible and debuggable, which is what you want the first time an install stalls at bootstrap; once you have seen it work, the ISO route is the one to use.