

Most failed Windows Server 2025 installs are not failed installs at all. Setup finishes and the server boots, but it is the wrong edition or the wrong installation option for the job, and you can’t fix either one later without reinstalling. This Windows Server 2025 installation guide treats those two choices as the real work, because the setup screens themselves take ten minutes and ask almost nothing.
We cover the evaluation download, the four images on the ISO and the Windows Setup screens from boot to first login. Then we look at what Server Core boots into (SConfig) and how to convert an evaluation install to a licensed edition with DISM before the 180-day clock runs out. In our Proxmox lab we listed the images on the current evaluation ISO, applied its Datacenter Evaluation Server Core image to a blank disk with DISM and an answer file, and converted that install, so the outputs below come from that box. The behavior described here was checked against Windows Server 2025 build 26100 in October 2026.
What the server needs before setup starts
Windows Server 2025 needs a 64-bit CPU that supports SSE4.2 and POPCNT, which is the change from 2022 that catches old hardware and old virtual CPU models. The rest of the list is modest, and Microsoft’s hardware requirements page calls all of it an absolute minimum rather than a sizing target:
- Processor: 1.4 GHz x64 with NX/DEP, CMPXCHG16b, LAHF/SAHF, PrefetchW, SLAT (EPT or NPT), SSE4.2 and POPCNT. On Proxmox, the default
x86-64-v2-AESCPU type already exposes both, and so doeshost. Old generic models such askvm64andqemu64, and anything older than Nehalem, fail. - Memory: 2 GB for Server Core and 2 GB for Desktop Experience, with 4 GB recommended for the latter. A VM with 1,024 MB fails setup, so give the installer at least 1,280 MB and shrink it afterwards if you must.
- Disk: 32 GB, which Microsoft describes as the floor for Server Core with IIS. Desktop Experience needs more room for itself and for cumulative updates.
- Firmware and TPM: UEFI with Secure Boot and a TPM 2.0 are needed only for features such as BitLocker and Secured-core, not to install. Setup runs fine without a TPM.
Those numbers describe a server that boots, not one that does anything useful. Our lab VM had 4 vCPUs, 8 GB of RAM and a 40 GB disk for the Core install. That’s a comfortable floor for a lab domain controller or file server, while a Hyper-V host or SQL Server box is sized from its workload. On KVM, the virt-install walkthrough for Windows Server 2025 on KVM and the virt-manager version of the same install cover the VirtIO disk and network drivers that setup does not ship with. On Proxmox, build it once and clone it: our Windows Server template for Proxmox shows how.
Where the Windows Server 2025 evaluation download comes from
The free media is on the Microsoft Evaluation Center, as a 64-bit ISO in eight languages or a 64-bit VHD in English only. It installs a fully working Standard or Datacenter edition that expires 180 days after installation. The page also warns that an evaluation install has to be activated over the internet within its first 10 days, or it starts shutting itself down. Volume licensing customers get the non-evaluation ISO from the Microsoft 365 admin center instead, and that one installs the licensed editions directly.
Third-party mirrors of the ISO turn up in search results, and there is no reason to use one when Microsoft’s copy is free. The ISO we tested carries the volume label SSS_X64FREE_EN-US_DV9. Its images report build 10.0.26100.32230 and a January 2026 creation date, so a fresh install already has more than a year of cumulative updates baked in. For a physical server, write the ISO to a USB stick with Rufus on Windows, the same way our bootable Windows USB guide does it for Windows 11. The Server ISO is 7.6 GB, more than most “8 GB” sticks actually hold, so use a 16 GB stick.
How the four editions on the ISO differ
The ISO holds four images: two editions, each in two installation options. You can read them yourself before booting anything. Mount the ISO on any Windows machine (here it was drive D:) and ask DISM’s PowerShell module what is inside install.wim:
Get-WindowsImage -ImagePath D:\sources\install.wim | Format-Table ImageIndex, ImageName, @{n='SizeGB';e={[math]::Round($_.ImageSize/1GB,2)}} -AutoThe index numbers are the ones setup and DISM use, and the sizes show what each option costs on disk before a single role is added:
ImageIndex ImageName                                                      SizeGB
---------- ---------                                                      ------
         1 Windows Server 2025 Standard Evaluation                         10.54
         2 Windows Server 2025 Standard Evaluation (Desktop Experience)       23
         3 Windows Server 2025 Datacenter Evaluation                       10.54
         4 Windows Server 2025 Datacenter Evaluation (Desktop Experience)  23.02
An image without “(Desktop Experience)” in its name is Server Core. The image’s own description says so in words Microsoft rarely uses elsewhere: index 1 reports InstallationType : Server Core, EditionId : ServerStandardEval and a description that starts with “(Recommended) This option omits most of the Windows graphical environment.” The Desktop Experience images are more than twice the size, and that gap is not just disk space, since every extra component is something Patch Tuesday has to service and something that can need a reboot.
| Choice | Standard | Datacenter |
|---|---|---|
| Virtualization rights | 2 Windows Server VMs per fully licensed host | Unlimited Windows Server VMs |
| Storage Spaces Direct, Storage Replica (full) | No (Storage Replica limited) | Yes |
| Converts from evaluation to | Standard or Datacenter (Desktop Experience); Datacenter Core only (Server Core) | Datacenter only |
| Server Core image size | 10.54 GB | 10.54 GB |
| Desktop Experience image size | 23 GB | 23.02 GB |
The rule that matters most is in Microsoft’s installation options page: you cannot switch between Server Core and Desktop Experience after installation. Pick Core for domain controllers, DNS, DHCP, file servers and Hyper-V hosts you manage remotely. Pick Desktop Experience when an application needs the GUI, when the server is a Remote Desktop Session Host, or when the people running it will log on at the console. The evaluation media adds two more traps. An evaluation Datacenter install can only convert to Datacenter, so don’t pick it on a Standard licence. And an evaluation Standard Core install converts only to Datacenter Core, never to Standard Core, so a Standard licence holder who wants Server Core should install from the non-evaluation media instead.
How the Windows Server 2025 installation runs, screen by screen
Setup in Windows Server 2025 uses the redesigned installer that arrived with Windows 11 24H2, so the screens look different from 2022 even though they ask the same questions. The screenshots in this section come from Gedion’s original install of the evaluation ISO on a KVM host, which used a VM with 8 GB of RAM, 3 vCPUs and a 40 GB disk, created in Cockpit with the ISO as the installation source:

Boot the VM or the USB stick and press a key when the firmware prompts you to boot from CD or DVD. Miss that prompt on a UEFI machine and the firmware falls through to the next boot device, which on a blank disk means a “no bootable device” screen and a reset. The first two screens set the install language, the time and currency format and the keyboard layout. Only the keyboard matters for the next half hour, because it is what you type the Administrator password with:

Pick the layout of the keyboard you will actually type on, then click Next:

The setup option screen is where the new installer differs most from the old one. Select Install Windows Server and tick the box that agrees everything will be deleted, which is the installer’s way of saying this is a clean install and not an upgrade. The Previous Version of Setup link at the bottom brings back the classic installer, which is useful when an older answer file or a habit depends on it:

Select Image lists the same four images DISM printed earlier, in the same order. This is the decision you can’t undo, so read the description under the list before clicking Next: the Desktop Experience entries say they install the full graphical environment, and the plain entries are Server Core. The original install chose Windows Server 2025 Datacenter Evaluation (Desktop Experience):

Accept the licence terms on the next screen. The evaluation media goes straight from the image list to the terms because it has no product key to ask for:

The disk screen is where VMs on KVM and Proxmox most often stall. Setup includes drivers for SATA, IDE and the common physical RAID controllers, but not for VirtIO SCSI, so a VM with a VirtIO disk shows an empty list here. Attach the virtio-win ISO as a second CD drive, click Load Driver and browse to vioscsi\2k25\amd64 (or viostor\2k25\amd64 for a VirtIO Block disk), and the disk appears; our VirtIO drivers guide covers the rest of the drivers after install. With a single blank disk, select its unallocated space and click Next, and setup creates the EFI, MSR and Windows partitions on its own:

Ready to install recaps the image and confirms nothing is kept. Click Install:

The copy and expand phase runs on its own and reboots the machine more than once. How long it takes depends almost entirely on how fast the disk absorbs the 10 to 23 GB image, which is why the same ISO installs in minutes on NVMe and drags on busy shared storage:

After the last reboot, setup asks for the password of the built-in Administrator account. There is no Microsoft account prompt on Server. On Server Core a diagnostic data question still waits at first sign-in, as the next section shows. The default complexity policy wants characters from at least three categories (upper case, lower case, digits, symbols) and no account name in the password, and a password that fails it sends you back to this screen:

Press Ctrl+Alt+Delete at the lock screen and sign in as Administrator. In a VM console, use the console’s own Ctrl+Alt+Del button, since your workstation keeps that key combination for itself:

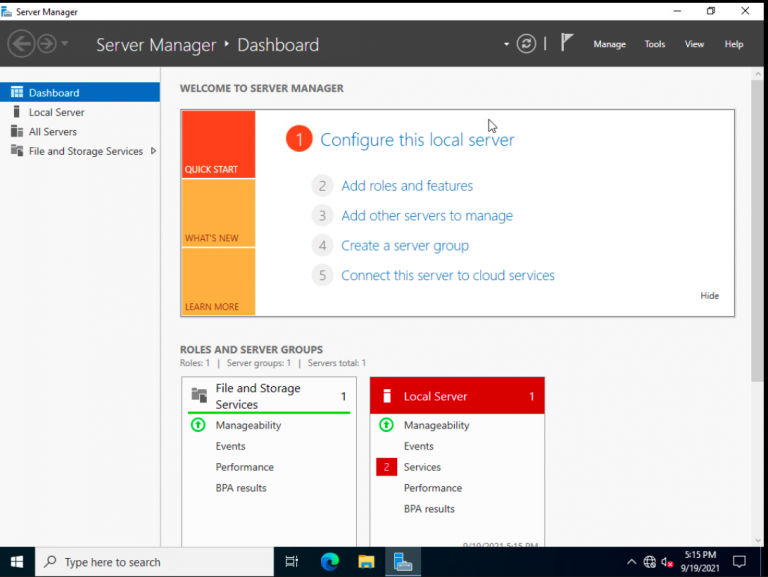
Desktop Experience opens Server Manager on every sign-in. Its Local Server page shows the computer name, network, update and activation state in one place, so it doubles as the checklist for the next section:

A Server Core install asks the same questions in the same order and ends somewhere very different: a blue PowerShell console with a numbered menu in it.
What Server Core boots into: SConfig
Server Core logs you in to a console, not a desktop, and on Windows Server 2025 the first thing in that console is not SConfig. On our fresh Datacenter Evaluation Core install, the first sign-in stopped on a diagnostic data question in a cmd.exe window, and nothing else happened until it was answered. Type 1 for Required or 2 for Required plus Optional and press Enter. Leaving it blank picks Required plus Optional, which is not the choice most server owners want:

Once that is answered, SConfig opens on its own, as it has on Server Core since 2022. It is a numbered PowerShell menu over the settings a new server needs, and it covers almost everything in the first hour without typing a cmdlet. The title bar is worth a glance too, because it names the edition and the computer you are actually on:

- 1Edition in the title bar
- 2Turn off auto-launch
- 3Network settings
- 4Windows activation
- 5Exit to command line (PowerShell)
The marked parts are the ones a fresh install needs first:
- Edition in the title bar: it says Datacenter Evaluation here, and it is the quickest way to confirm the conversion later worked.
- Turn off auto-launch: the warning line gives the exact command,
Set-SConfig -AutoLaunch $false, for when you would rather land in PowerShell. - Network settings: option 8 sets a static IP, gateway and DNS servers on any adapter.
- Windows activation: option 11 shows the licence status and installs a product key, but it does not change an evaluation edition (the next section explains why).
- Exit to command line (PowerShell): option 15 leaves the menu for an elevated PowerShell prompt, and typing
sconfigbrings it back.
SConfig also runs on Desktop Experience if you type sconfig in an elevated PowerShell window, and it works over Remote Desktop, but not inside a remote PowerShell session. What it does not show is how little Server Core costs to run. On our lab VM, right after first sign-in, the Core install used 9.67 GB of its 40 GB disk and 1,355 MB of RAM with 62 processes running, while the Desktop Experience template we cloned for the lab, on the same build but also carrying our VirtIO tools and lab agents, had 15.1 GB in use on its system drive. That gap is the reason Microsoft labels Core “(Recommended)”.
How to convert the evaluation to a licensed edition
An evaluation install is converted in place with DISM, using a product key for the edition you are licensed for, and the server keeps its roles, data and settings. The mechanism is an edition upgrade rather than a key swap, which is why typing a key into the activation screen is not enough. Do it early: Microsoft blocks the conversion on a domain controller, and every role you add first is one more thing on the box when it restarts.
Start by confirming what you have. slmgr.vbs opens a message box when run directly, which is useless over a remote shell, so call it through cscript to get text back:
cscript //nologo C:\Windows\System32\slmgr.vbs /dliThe TIMEBASED_EVAL channel is what marks an evaluation, and the expiry counts down from the first boot:
Name: Windows(R), ServerDatacenterEval edition
Description: Windows(R) Operating System, TIMEBASED_EVAL channel
Partial Product Key: J2T92
License Status: Licensed
Timebased activation expiration: 259183 minute(s) (180 day(s))
The verbose form, /dlv, adds one line worth knowing about: Remaining Windows rearm count: 1. On our install that single rearm is the only way to stretch the evaluation past 180 days, so plan the conversion rather than counting on extensions. Next, ask DISM for the current edition and the editions it can move to:
DISM /online /Get-CurrentEdition
DISM /online /Get-TargetEditions
Read the edition names carefully, because this is where a Server Core install differs from what most guides show:
Current Edition : ServerDatacenterEvalCor
The operation completed successfully.

Editions that can be upgraded to:

Target Edition : ServerTurbineCor
Target Edition : ServerDatacenterCor
The operation completed successfully.
Server Core editions end in Cor, and ServerTurbineCor is the edition ID Datacenter: Azure Edition uses. Leave that one alone unless you know you need it: Azure Edition runs only as a virtual machine, is available only to Software Assurance, Windows Server subscription and cloud customers, and carries no virtualization rights of its own. A Datacenter evaluation offers no Standard target at all, which matches Microsoft’s rule that an evaluation Datacenter install converts only to Datacenter. The ServerDatacenter name that Microsoft’s own example uses is the Desktop Experience edition, and on a Core box it fails.
Error: 50 “This Windows image cannot upgrade to the edition of Windows that was specified”
We hit this on the first attempt by passing /Set-Edition:ServerDatacenter to the Core install. DISM refuses before it changes anything and returns in about a second:
Error: 50

This Windows image cannot upgrade to the edition of Windows that was specified. The upgrade cannot proceed.
Run the /Get-TargetEditions option to see what edition of Windows you can upgrade to.
Copy the target name exactly as /Get-TargetEditions printed it, which is ServerDatacenterCor here. If the edition you want is missing from that list (Standard from a Datacenter evaluation, say), no key will make it appear. Only a fresh install of the right image gets you there.
Error 0xC004F069 when installing a key on an evaluation
The other shortcut people try is slmgr /ipk with the new key. On the evaluation install it fails straight away, because the key belongs to a different edition from the one installed:
Error: 0xC004F069 On a computer running Microsoft Windows non-core edition, run 'slui.exe 0x2a 0xC004F069' to display the error text.slmgr /ipk is still the right tool after the conversion, for switching between retail, volume and OEM keys within the same edition. It just can’t change the edition.
Run the conversion
With the target name confirmed, run the conversion with your product key. Our lab used the public KMS client setup key for Datacenter (D764K-2NDRG-47T6Q-P8T8W-YP6DF, from Microsoft’s KMS client key list), which is what a server that activates against a KMS host uses. With a retail or MAK key, put that key in its place. We ran it with /NoRestart so the restart happened on our schedule:
DISM /online /Set-Edition:ServerDatacenterCor /ProductKey:D764K-2NDRG-47T6Q-P8T8W-YP6DF /AcceptEula /NoRestartDISM installed the key, added the Datacenter Core edition package and finished the component update in 26 seconds, and then printed an error on the last step:
Starting to update components...
Starting to install product key...
Finished installing product key.

Adding package Microsoft-Windows-ServerDatacenterCorEdition~31bf3856ad364e35~amd64~~10.0.26100.1742
[==========================100.0%==========================]
Finished updating components.

Starting to apply edition-specific settings...

Error: 1168

An error occurred while applying target edition component settings. The upgrade cannot proceed.
For more information, review the log file.
Don’t start over when you see this. The registry still said ServerDatacenterEval at that point, but the edition package was already staged, and the conversion completed during the next boot. Restart and check again:
Restart-Computer -ForceAfter one restart, DISM reported the retail Core edition and only one target left, the Azure Edition:
Current Edition : ServerDatacenterCor
The operation completed successfully.

Editions that can be upgraded to:

Target Edition : ServerTurbineCor
The operation completed successfully.
The licensing side moved too. slmgr.vbs /dli now shows the Datacenter edition on the VOLUME_KMSCLIENT channel, and the evaluation timer is gone. The Notification status is expected in a lab with no KMS host. With a retail or MAK key, slmgr.vbs /ato activates it online:
Name: Windows(R), ServerDatacenter edition
Description: Windows(R) Operating System, VOLUME_KMSCLIENT channel
Partial Product Key: YP6DF
License Status: Notification
Notification Reason: 0xC004F056.
Configured Activation Type: All
SConfig agrees, and its title bar dropped the word Evaluation. The name WS2025-01 and Remote Desktop show here, and in the earlier screenshot, because we had already run the rename and RDP commands from the next section and restarted once before converting:

One more quirk from the same box: the optional /GetEula step that Microsoft suggests for saving the licence terms returned Error: 1168 Element not found on Server Core. The setup licence screen points to the full terms at aka.ms/useterms, which is the simpler place to read them.
What to configure in the first hour
A new server has a random name, a DHCP address, the Pacific time zone and Remote Desktop switched off, and every one of those is cheaper to fix before the server joins a domain or gets a role. These are the commands we ran on the Core box from an elevated PowerShell session (option 15 in SConfig drops you there). They work the same on Desktop Experience.
Rename the computer first, because the name ends up in DNS records, certificates and the domain, and renaming later means touching all three. The rename takes effect at the next restart, so batch it with the edition change if you are converting:
Rename-Computer -NewName WS2025-01 -ForceSet the time zone next. The evaluation image ships with Pacific time, and log timestamps in the wrong zone make every later investigation harder. Get-TimeZone -ListAvailable lists the IDs, and Nairobi is the one we used:
Set-TimeZone -Id 'E. Africa Standard Time'
Get-TimeZone | Select-Object Id, DisplayName
The display name confirms the offset Windows will apply:
Id          : E. Africa Standard Time
DisplayName : (UTC+03:00) Nairobi
Remote Desktop is the easiest way into a Desktop Experience server and a convenient one into Core, where it opens the same console you see locally. Two settings control it: the fDenyTSConnections registry value that turns the listener on, and the built-in firewall rules that let port 3389 in. Missing the second one is the usual reason RDP “is enabled” but nobody can connect:
Set-ItemProperty -Path 'HKLM:\System\CurrentControlSet\Control\Terminal Server' -Name fDenyTSConnections -Value 0
Enable-NetFirewallRule -DisplayGroup 'Remote Desktop'
Get-NetFirewallRule -DisplayGroup 'Remote Desktop' | Format-Table DisplayName, Enabled, Direction -Auto
All three inbound rules in the group should read True:
DisplayName                         Enabled Direction
-----------                         ------- ---------
Remote Desktop - Shadow (TCP-In)       True   Inbound
Remote Desktop - User Mode (TCP-In)    True   Inbound
Remote Desktop - User Mode (UDP-In)    True   Inbound
Check the network before giving the server a fixed address. Our VM came up on the VirtIO adapter with a DHCP lease, which is what you want to see before you change anything:
Get-NetIPConfiguration | Select-Object InterfaceAlias, InterfaceDescription, @{n='IPv4';e={$_.IPv4Address.IPAddress}}, @{n='DHCP';e={(Get-NetIPInterface -InterfaceIndex $_.InterfaceIndex -AddressFamily IPv4).Dhcp}} | Format-ListThe interface alias in this output is the name every later network command needs:
InterfaceAlias       : Ethernet
InterfaceDescription : Red Hat VirtIO Ethernet Adapter
IPv4                 : 10.0.1.50
DHCP                 : Enabled
For the static address itself, SConfig option 8 asks for the IP, mask, gateway and DNS servers in turn. It’s the safer tool when you’re on the console of a server you can’t reach any other way. Then install updates with option 6 and restart. After that the server is ready for its real job, and the usual next steps on this site are to add a local user account instead of working as Administrator, turn on OpenSSH Server for remote shells, and open firewall ports for whatever role comes next.
Where Windows Server 2025 installs go wrong
Most of the trouble with a new Server 2025 box comes from assumptions carried over from earlier releases or from Windows 11, and each of these has a concrete fix:
- “I’ll add the GUI later”: there is no supported path from Server Core to Desktop Experience or back on 2025. The Server Core App Compatibility feature adds a handful of MMC tools and Explorer, not the desktop, so a wrong pick means a reinstall.
- “Evaluation is just a trial key”: the edition itself is different (
ServerDatacenterEval), and only DISM’s/Set-Editionchanges it. Typing a retail key into the activation screen of an evaluation install does not convert it. - “It needs TPM 2.0 like Windows 11”: it doesn’t. The TPM and Secure Boot only matter for BitLocker, Secured-core and similar features, which is why old hypervisors without a virtual TPM still install it.
- “Any x64 CPU works”: the SSE4.2 and POPCNT requirement is new, and a VM on a generic CPU model fails before setup gets anywhere. Use the
hostCPU type or a model of Nehalem or later. - “I’ll convert the domain controller later”: Microsoft blocks the evaluation-to-retail conversion on a domain controller. Convert the server first, then install Active Directory Domain Services.
The order that avoids all five is short: pick the edition and installation option you are licensed for, install, convert the evaluation with DISM while the server has no roles, then name it, address it and patch it before anything depends on it. If you are building a lab around this server, the Windows Server administration books we recommend cover the roles that usually come next in much more depth than any single guide can.




Very good
Thank you Bial, very much appreciated.