

Producing and consuming APIs from different sources is the bread and butter of every modern web application. On the client side, it’s the way we communicate with the server and constantly update the states of our application.

HTTP-served REST APIs are arguably the most common form of exchange at the moment. They provide an easy form of exchange in JSON format. We can easily communicate with the server through a simple curl or fetch.
I believe the integration and communication with the server should feel as intuitive as possible, however, and this becomes especially apparent after working with GraphQL and Apollo. Knowing exactly what service to call, how to call it, and what results to expect greatly improves efficiency and productivity for us frontend engineers.
In this tutorial, we will look at how to integrate an OpenAPI-generated service from the server, and then use this generated service across a React application. Using web frameworks like Django, Rails, Spring, or NestJS, we can easily produce OpenAPI definitions through our application code.
The OpenAPI Specification (formerly the Swagger Specification) is framework-agnostic, however, and can be used to generate information about routes, data types, etc. OpenAPI serves as a solid exchange format to help API metadata traverse between different languages.
What should you take away from this post? Given an OpenAPI (JSON or YAML) endpoint, we would like to generate:
The generated services should include all the exposed routes; all the data types they need for communication; an exhaustive list of all the required/optional parameters; and, importantly, the data types the calls return.
We’ll do this by having the server generate all the services for communicating with the endpoints. This provides three critical advantages for the frontend engineer:
We will see all this firsthand by building a simple to-do list. Without further ado, let’s get to the more technical parts of the tutorial. Here’s an outline of what we’ll cover:
Per the documentation:
The OpenAPI Specification (OAS) defines a standard, language-agnostic interface to RESTful APIs. When properly defined, a consumer can understand and interact with the remote service with a minimal amount of implementation logic.
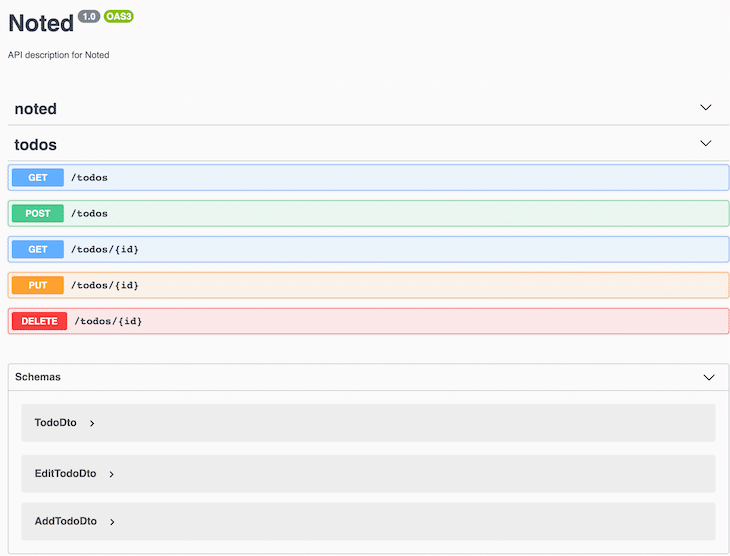
OAS makes visualizing the services’ capabilities easy. With documentation generators like Swagger, you can generate a UI for testing the API calls. Below is an example of the todo server we’ll be interacting with.
In this example server, I have used NestJS with Swagger. The server implementation language and details are irrelevant — as long as we have the OpenAPI specifications and Swagger UI implemented, we’ll end up with the same outcome.
Let’s quickly go through the server code. We’ve kept it minimal because this is not the main point here. Nevertheless, we’ll look at the services from the server side so we can appreciate the ease with which we get the interfaces, API functions, etc. transferred to the client. The full code can be found in this GitHub repo.
Some of the code is NestJS-specific, but it’s not super important to fully understand it all; having a general idea of what’s happening will suffice. I will show the code and walk through it — ready? As a reminder, this is a to-do with create, read, update, and delete (CRUD) functions:
import { TodoService } from './../services/todo/todo.service';
import { TodoDto, AddTodoDto, EditTodoDto } from './../dto';

import {
  Controller,
  Get,
  Param,
  Post,
  Put,
  Body,
  Delete,
} from '@nestjs/common';
import { ApiResponse, ApiTags } from '@nestjs/swagger';

@ApiTags('todos')
@Controller('todos')
export class TodoController {
  public constructor(private readonly todoService: TodoService) {}

  @Get()
  @ApiResponse({
    status: 200,
    description: 'Found todo',
    type: [TodoDto],
  })
  public findAll(): Promise<TodoDto[]> {
    return this.todoService.findAll();
  }

  @Get(':id')
  public findOne(@Param('id') id: number): Promise<TodoDto> {
    return this.todoService.findOne(id);
  }

  @Put(':id')
  public edit(
    @Param('id') id: number,
    @Body() todo: EditTodoDto,
  ): Promise<TodoDto> {
    return this.todoService.edit(id, todo);
  }

  @Post()
  public add(@Body() todo: AddTodoDto): Promise<TodoDto> {
    return this.todoService.add(todo);
  }

  @Delete(':id')
  public remove(@Param('id') id: number): Promise<TodoDto> {
    return this.todoService.remove(id);
  }
}
In the code above, you will quickly notice a pattern — we have a bunch of public methods. Their names all make it clear what they do. Notice any other features?
Let’s look at findAll. Obviously, this finds all the available todos; it doesn’t expect any parameters but just calls todoService.findAll(). The full code for the todoService can be found here, but once again, we don’t care about the implementation details, just what parameters it expects and what it returns.
When we look at edit, we can see it expects an id and a post body DTO with the type EditTodoDto. With these, we can map the endpoints to the Swagger UI above.
Now that we’ve had a peek into what the server looks like, how do we generate services in the frontend that mimic all the public methods in the server? To demonstrate this, we’ll create a simple to-do with TypeScript for the client.
Let’s create our note-keeping app — we’ll call it Noted 😉. This will generate all boilerplates with Redux Toolkit for state management.
npx create-react-app noted --template redux-typescript
//or
yarn create-react-app noted --template redux-typescript
Before we do anything, let’s generate the services from the server endpoint. For this we’ll be using openapi-typescript and openapi-typescript-codegen. Let’s install them first.
yarn add openapi-typescript openapi-typescript-codegen. --dev
// or
npm i  openapi-typescript openapi-typescript-codegen -D
But how do we get them to do any work? How do we connect to the server? We’ll need a running server for that, so for convenience, run the NestJS server we created earlier with yarn start.
Now that we have a running server, we’ll create a script to pull the services for the server endpoint. We also could have used the downloaded JSON or YAML.
Your server should be running on port -3000. Now run:
openapi -i http://localhost:3000/api-json -o src/services/openapi
We’ll add this as a script to our package.json for easier reference, or maybe for a pre-commit hook:
"types:openapi": "openapi -i http://localhost:3000/api-json -o src/services/openapi"
These commands tell the generator to generate the openApi services inside src/services/openapi. All the other tags and commands can be found in the documentation.
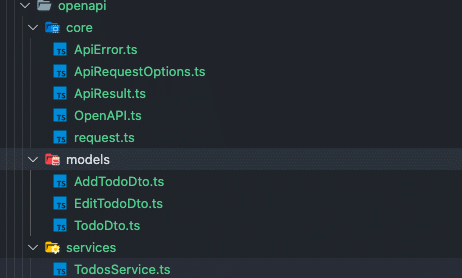
If we look inside src/services/openapi, we can see all the generated code:
Of particular interest are the models, which provide all the types necessary for interfacing with the API, as well as the TodoService.ts, which provides all the services, like those we saw in the server. Let’s have a peek.
import type { AddTodoDto } from "../models/AddTodoDto";
import type { EditTodoDto } from "../models/EditTodoDto";
import type { TodoDto } from "../models/TodoDto";
import { request as __request } from "../core/request";

export class TodosService {

  public static async findAll(): Promise<Array<TodoDto>> {
    const result = await __request({
      method: "GET",
      path: `/todos`,
    });
    return result.body;
  }

  public static async add(requestBody: AddTodoDto): Promise<any> {
    const result = await __request({
      method: "POST",
      path: `/todos`,
      body: requestBody,
    });
    return result.body;
  }

  public static async findOne(id: number): Promise<any> {
    const result = await __request({
      method: "GET",
      path: `/todos/${id}`,
    });
    return result.body;
  }

  public static async edit(id: number, requestBody: EditTodoDto): Promise<any> {
    const result = await __request({
      method: "PUT",
      path: `/todos/${id}`,
      body: requestBody,
    });
    return result.body;
  }

  public static async remove(id: number): Promise<any> {
    const result = await __request({
      method: "DELETE",
      path: `/todos/${id}`,
    });
    return result.body;
  }
}
As we can see, these are all identical to the services in the server, all without having to type a single line of code. Isn’t that awesome? Notice that all the correct param types as well as return types have been correctly mapped. We can peek into src/services/openapi/core.request.ts to get a better understanding of how the API calls are formulated.
And that’s it — we have generated the code required to make API calls. Next we’ll cover how to use these generated code services.
For the sake of brevity, we’ll look at snippets to perform specific API calls rather than the whole app. The full code for the to-do can be found here.
Now for the fun part. How do we use these generated services?
We have many ways to do this: we could create a hook that wraps over the requests and the call inside our app; in the case of Redux Toolkit, we could call them inside a thunk. Let’s explore both examples.
First we’ll create a reusable wrapper; we can call it whatever we like. It goes like so:
import {
  AddTodoDto,
  EditTodoDto,
  OpenAPI,
  TodoDto,
  TodosService,
} from '../openapi';

const { add, edit, findAll, findOne, remove } = TodosService;

OpenAPI.BASE = 'http://localhost:3000';

export const getTodos = async () => {
  try {
    const todos: TodoDto[] = await findAll();
    return todos;
  } catch (error) {
    throw new Error(error);
  }
};

export const getTodoById = async (id: number): Promise<TodoDto> => {
  try {
    return await findOne(id);
  } catch (error) {
    throw new Error(error);
  }
};

export const addTodo = async (newTodo: AddTodoDto): Promise<TodoDto> => {
  try {
    return await add(newTodo);
  } catch (error) {
    throw new Error(error);
  }
};

export const updateTodo = async (
  id: number,
  todo: EditTodoDto
): Promise<TodoDto> => {
  try {
    return await edit(id, todo);
  } catch (error) {
    throw new Error(error);
  }
};

export const deleteTodo = async (id: number) => {
  try {
    await remove(id);
  } catch (error) {
    throw new Error(error);
  }
};
Inside the application, we can then call findAll() — for example, inside a useEffect. We’ll look at a more concrete example later. But first, notice the line where we did this:
OpenAPI.BASE = 'http://localhost:3000';
What we’ve done here is set the base URL of the generated client to http://localhost:3000. This is trivial, but let’s imagine we want to set some defaults in our application, like authorization headers, etc.
We can set some defaults for the OpenAPI. The complete interface for expected config looks likes this:
type Resolver<T> = () => Promise<T>;
type Headers = Record<string, string>;

type Config = {
  BASE: string;
  VERSION: string;
  WITH_CREDENTIALS: boolean;
  TOKEN?: string | Resolver<string>;
  USERNAME?: string | Resolver<string>;
  PASSWORD?: string | Resolver<string>;
  HEADERS?: Headers | Resolver<Headers>;
};

export const OpenAPI: Config = {
  BASE: "",
  VERSION: "1.0",
  WITH_CREDENTIALS: false,
  TOKEN: undefined,
  USERNAME: undefined,
  PASSWORD: undefined,
  HEADERS: undefined,
};
So let’s say our API is password-protected. We can tell the codegen to use that password before every request with:
OpenAPI.PASSWORD = 'my-super-secret-password'
Or imagine you’d like to get a token and add it to the request header. We’d have:
const getToken = async () => {
    // Some code that requests a token...
    return 'SOME_TOKEN';
}

OpenAPI.TOKEN = getToken;
// or
const myHeaderObject = {
   ...rest,
   Authorization: `Bearer ${getToken()}`
}

OpenAPI.HEADERS = {myHeaderObject}
To use any of the services, we simply call them inside the application (taking into consideration how we manage the state, of course). An example from our to-do looks something like this:
import React, { useCallback, useEffect, useState } from 'react';
import {AddTodo , TodoItem }from './features/todo';
import { getTodos, addTodo, updateTodo, deleteTodo } from './services/api/todo';
import { AddTodoDto, ApiError, EditTodoDto, TodoDto } from './services/openapi';

import './App.css'

const App = () => {
  const [todos, setTodos] = useState<TodoDto[]>([]);
  const [error, setError] = useState<ApiError|null>();

const  handleSaveTodo=useCallback((e: React.FormEvent, formData: AddTodoDto) =>{
    e.preventDefault();
    addTodo(formData)
      .then((todo) => todo)
      .catch((err) => setError(err));
  },[])

  const handleUpdateTodo = useCallback((id: number, todo: EditTodoDto) => {
    updateTodo(id, todo)
      .then((updatedTodo) => updatedTodo)
      .catch((err) => setError(err));
  },[]);

  const handleDeleteTodo = useCallback((id: number) => {
    deleteTodo(id).catch((err) => setError(err));
  },[]);

  useEffect(() => {
    getTodos()
      .then((allTodos) => setTodos(allTodos))
      .catch((error) => setError(error));
  }, []);

  return (
    <main className='App'>
      <h1>My Todos</h1>
      <AddTodo saveTodo={handleSaveTodo} />
      {todos.map((todo: TodoDto) => (
        <TodoItem
          key={todo.id}
          updateTodo={handleUpdateTodo}
          deleteTodo={handleDeleteTodo}
          todo={todo}
          error={error}
        />
      ))}
    </main>
  );
};

export default App;
You can see how we just simply called the services inside the application. We can even make our application cleaner by creating a hook that’s called once, and we can do away with all the API calls inside the App.tsx. I won’t go into much detail since this isn’t the point of the article, but this surely helps us visualize how powerful yet malleable this is:
import { useCallback, useState } from 'react'
import { ApiError, OpenAPI } from '../services/openapi'

export function useApi() {
  const [error, setError] = useState<ApiError | undefined>(undefined)
  const [isLoading, setIsloading] = useState<boolean>(true)

  OpenAPI.BASE = process.env.REACT_APP_API_ENDPOINT as string
  const handleRequest = useCallback(async function <T>(request: Promise<T>) {
    setIsloading(true)
    try {
      const response = await request
      setError(undefined)
      return response
    } catch (error) {
      setError(error)
    } finally {
      setIsloading(true)
    }
  }, [])

  function dismissError() {
    setError(undefined)
  }

  return { dismissError, error, isLoading, handleRequest }
}

export default useApi
Again, the full code implementation can be found here.
There we have it — a detailed walkthrough of generating OpenAPI services from a backend. We have used NestJS in this case, but this process is framework-agnostic.
We explored how to generate the corresponding service functions in the client using a React app as an example. We looked at how getting exposure to the underlying services, types, and interfaces from the server makes the frontend engineer’s life much easier. With TypeScript especially, we are able to reap the benefits of a type-safe system that provides predictability and transparency.
LogRocket lets you replay user sessions, eliminating guesswork by showing exactly what users experienced. It captures console logs, errors, network requests, and pixel-perfect DOM recordings — compatible with all frameworks, and with plugins to log additional context from Redux, Vuex, and @ngrx/store.
With Galileo AI, you can instantly identify and explain user struggles with automated monitoring of your entire product experience.
Modernize how you understand your web and mobile apps — start monitoring for free.
Install LogRocket via npm or script tag. LogRocket.init() must be called client-side, not
server-side
$ npm i --save logrocket

// Code:

import LogRocket from 'logrocket';
LogRocket.init('app/id');
// Add to your HTML:

<script src="https://cdn.lr-ingest.com/LogRocket.min.js"></script>
<script>window.LogRocket && window.LogRocket.init('app/id');</script>

Learn how to use browser AI APIs for summarization, translation, and language detection with practical examples and implementation tips.

Build a live task board with Topcoat and Rust, using reactive signals, server-rendered search, and WebSocket updates.
Learn how to build and install three Claude Code mods to monitor usage, protect secrets, and track changes.

I tested Jev against popular LLMs to compare speed, cost, and accuracy on real bank support messages.
Hey there, want to help make our blog better?
Join LogRocket’s Content Advisory Board. You’ll help inform the type of content we create and get access to exclusive meetups, social accreditation, and swag.
Sign up now

 Learn more →