In this small guide, we’ll try to Map sip users configured in Asterisk sip.conf file with XMPP users configured in Openfire XMPP server.If you’re reading thus article,you’ll need to have installed and configured Asterisk Server with Extensions.conf and sip.conf files working.I also assume that you’ve added xmpp users to your Openfire server. This tutorials can be of help if you’re getting started.
Installation of Asterisk PBX:
nstallation of Openfire XMPP Chat Server:
Once you’ve a list of users on both Openfire and Asterisk, you can start the mapping.
Setup Pre-requisites
You must add sip and Asterisk IM plugins for Openfire. Do this on your Openfire server if you haven’t.
cd /opt/openfire/plugins/
wget http://www.igniterealtime.org/projects/openfire/plugins/sip.jar
wget https://github.com/igniterealtime/asterisk-im/releases/download/release-2.0.0/asterisk-im.jar
Have extensions.conf,sip.conf files configured. See my files below. Extensions.conf file
[company]
exten=>_.,1,Dial(SIP/${EXTEN},10,r)
same=>n,VoiceMail(${EXTEN}@company-voicemail,u)
same=>n,VoiceMail(${EXTEN}@company-voicemail,b)
same=>n,Hangup()
Voicemail.conf
[company-voicemail]
101=>1234,mutai,[email protected]
102=>1234,denis,[email protected]
103=>1234,gene,[email protected]
;1234 : Password used to access voicemail Sip.conf
[101]
type=friend
secret=jose
username=jose
host=dynamic
context=company
disallow=all
allow=h264
allow=ulaw
qualify=yes
canreinvite=no
mailbox=101@company-voicemail
callerid=jose

[102]
type=friend
secret=denis
username=denis
host=dynamic
context=company
disallow=all
allow=ulaw
allow=h264
qualify=yes
canreinvite=no
mailbox=102@company-voicemail
callerid=denis

[103]
type=friend
secret=gene
username=gene
host=dynamic
context=company
disallow=all
allow=ulaw
allow=h264
qualify=yes
canreinvite=no
mailbox=103@company-voicemail
callerid=denis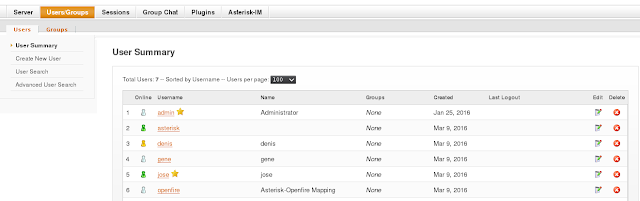
Now it’s time to do the mapping. Head over to Server menu, then Phone, then Add new XMPP username : Openfire account username
- SIP username : Username in Asterisk’s sip.conf file
- Authorization Username : Just same as SIP username
- Display Phone Number :
- Password : Sip user’s password.
- Server : Ip address of Asterisk Media server
- Outbound Proxy : Sip proxy if any
- Voice Mail Number: Number used to access voicemail.
Add all information above. If you want to add number to access voicemail, do it as shown below.
I will make *100 number dialed to access voicemail.
[voicemail]
exten => *100,1,NoOp(Access voicemail retrieval.)
same => n,VoiceMailMain(@company-voicemail)
Then include this context in the original context.It will look like this.
[company]
include =>voicemail
exten=>_.,1,Dial(SIP/${EXTEN},10,r)
same=>n,VoiceMail(${EXTEN}@company-voicemail,u)
same=>n,VoiceMail(${EXTEN}@company-voicemail,b)
same=>n,Hangup()
Now with all configurations completed. Download XMPP Client and configure it, i recommend any of the following:
Android: Chatsecure, Conversations, Xabber, yaxim
iOS: ChatSecure
Web-based: Jappix
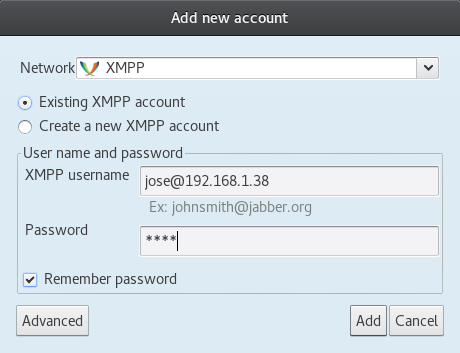
I will demonstrate on Adding account using Jitsi XMPP client. Install it on your platform, Linux, Windows, Mac,Android or iOS.
Launch Jitsi. Then click on File > Add new account, on Network select either XMPP or SIP. Add the two of them.
Sip ID user addition.
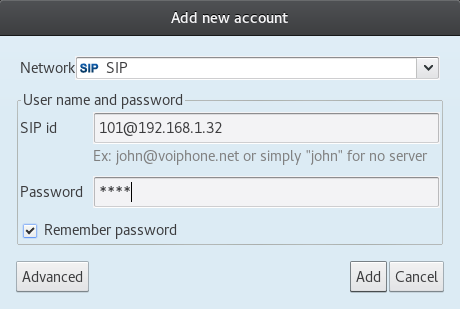
From there you can easily place calls and chat using the platform you just created. Hope this article was of help to you. If you encounter any error, post it in Comment section and i won’t hesitate to reply.